How to get "ProMode" on a Consumer Sony BRAVIA TV
This guide will show you how you can get "ProMode" on a Consumer Sony BRAVIA TV without having to purchase one of their "Pro" displays.
- Information
- Getting Started
- Getting the APK
- Installing the ProModeTool.apk app
- Starting ProMode and Permission Prompts
Information
The requirements, known supported models or potential models, and about the guide.
About
Hey there, this guide will guide you through getting your Sony TV working with "pro mode". For people who don't know, pro mode is a mode on Sony professional displays that allows you to do things like have a remote web UI, which is like iDRAC for Dell servers, set the allowed apps to be able to be used, lock the display in pro mode and require a password to go back to the normal mode, and many more options which are targeted towards corporate users. Now Pro mode used to be able to be used on their consumer TVs but Sony decided to make it more difficult to get it to try and make people purchase their Pro lineups instead which cost more.
Now the reason I made this guide in the first place. I was messing around on the TV and saw in the "All apps" section in settings that there was a system app called "Pro Mode" but it wasn't able to be opened. So I searched it up and it turns out you can't get it because of what I said above. I enabled adb on the TV to try and open it via the shell with intents but that didn't work, so I side-loaded an app called "App Manager" to see if that could open it in case I didn't type the right intent when trying in the adb shell since it can also do that and it can automatically find the app's intents and that didn't work either. So then comes where I got it working, which was when I was looking at Sony's documentation videos for the pro devices and on one of them they showed their home screen which had an app on there called "Pro Tools" which my TV model did not have but it had all the other items for pro mode. Then I thought "Well what if I extract the firmware from the pro models and get the ProTool apk"? When I was in the adb shell for my TV, I was also looking through the filesystem and came across a directory that had all the apk's that Sony pre-installs on the TV such as the TV app and the notifications app. I didn't know if it would work since, by default on the pro models, the Pro Tools app is installed as a system app and when you side-load apps with adb it installs it as a user app, but I went ahead and tried it and it worked! When I launched it, it asked for some permissions and worked just fine, so installing it as a user app worked anyway.
I was also looking around for information from people to see if they got it working on their TV at all and so far when writing this, no one has made a guide on this. I saw many people asking how to get Pro mode as well and everyone responded that they couldn't get it anymore because Sony removed it multiple updates ago and you couldn't get it on Android TV 10. Well, this guide shows you how you can and it works pretty well. In my opinion, if you have the apps/services installed on your TV, you should be able to use 100% of the device you paid for, not 90% or less. I wanted to make a detailed guide on how to make this work in case other people had the same question or wanted to use "Pro Mode" for themselves.
Requirements
So in order to do this, you'll need to following:
- A computer running either Windows, Mac OS, or if you run Linux like me, I had to get a Windows VM for this.
- 30 - 45 minutes at minimum but can vary for different people.
- A supported model, more below.
- You can find a supported model on the next page.
So what I meant by a "supported model" is that so far, as far as I can tell, is that the XR TV models would work the best for this. I created this guide using a XR-65A80K TV and it worked just fine but I don't have multiple TV's from the same series so I can't test them for myself to verify anymore than that. But the firmware my TV uses, it is also used on multiple TV's from the same series so it should have all the same stuff my TV started out with and should work the same way mine did. Now the BRAVIA 8 series is a little odd and the same goes for the K series. Basically they have different firmware and when I was looking through them, they don't have the "ProSettings" apk at all and unless you have root access you won't be able to get it working. Now here's the thing you can try it still and maybe it will work since I did go through the firmware with a hex editor and it still mentions "ProSettings", "hotelmode"/"ProMode" quite a lot and the "ProMode" apk is on there and seems to be installed and the file size is larger than the one I used so it could be bundled in now with the "ProMode" apk instead as separate apk's. The BRAVIA 8 series and K series also have a different filesystem layout than the XR series so if you're going to try it out yourself make sure you look at the "Extras" if you need any help finding what zip file you need to extract.
Now if you're using a Linux distro, you can extract the firmware on your host but the way the firmware is set up and where our apk that we're looking for is, I couldn't get anything to open it correctly or extract it correctly after that point, so I had to use a Windows VM the rest of the way. If you want to try for yourself then just so you know what I tried was binwalk, using peazip, ark, dd for a specific offset, and even trying to mount it as a loop back device and they all either returned errors, crashed, or made over 300GB of blank data. To help you out, you should know that the system.img file is what we're after and in the system.img file there's another system.img file and two other .img files, so the first system.img file is like .tar file or a container for the other 3. The three duplicate files in it are the actual .img files and the ones outside the system.img file are full of 0's and are like placeholders.
Supported Models
These are the known supported models that use the same firmware or have the requirements already installed on them. Just know it could be more since these are the only ones I checked, and I think more of the XR series could be functional so far.
- KD-43X80K
- KD-50X80K
- KD-55X80CK
- KD-55X80K
- KD-65X80CK
- KD-65X80K
- KD-75X80CK
- KD-75X80K
- KD-43X85K
- KD-50X85K
- KD-55X85K
- KD-65X85K
- KD-75X85K
- KD-85X80CK
- KD-85X80K
- KD-85X85K
- XR-55X90CK
- XR-55X90K
- XR-65X90CK
- XR-65X90K
- XR-75X90CK
- XR-75X90K
- XR-85X90CK
- XR-85X90K
- XR-65X95K
- XR-75X95K
- XR-85X95K
- XR-75Z9K
- XR-85Z9K
- XR-55A80CK
- XR-55A80K
- XR-65A80CK
- XR-65A80K
- XR-77A80CK
- XR-77A80K
- XR-42A90K
- XR-48A90K
- XR-55A95K
- XR-65A95K
Getting Started
This chapter is so we can get our TV ready, check to see if it's maybe supported if it's not in the "Known supported models" list and to get the software we need on our computer to extract the firmware and get our apk.
Prepare your TV
Check to see if your TV is supported
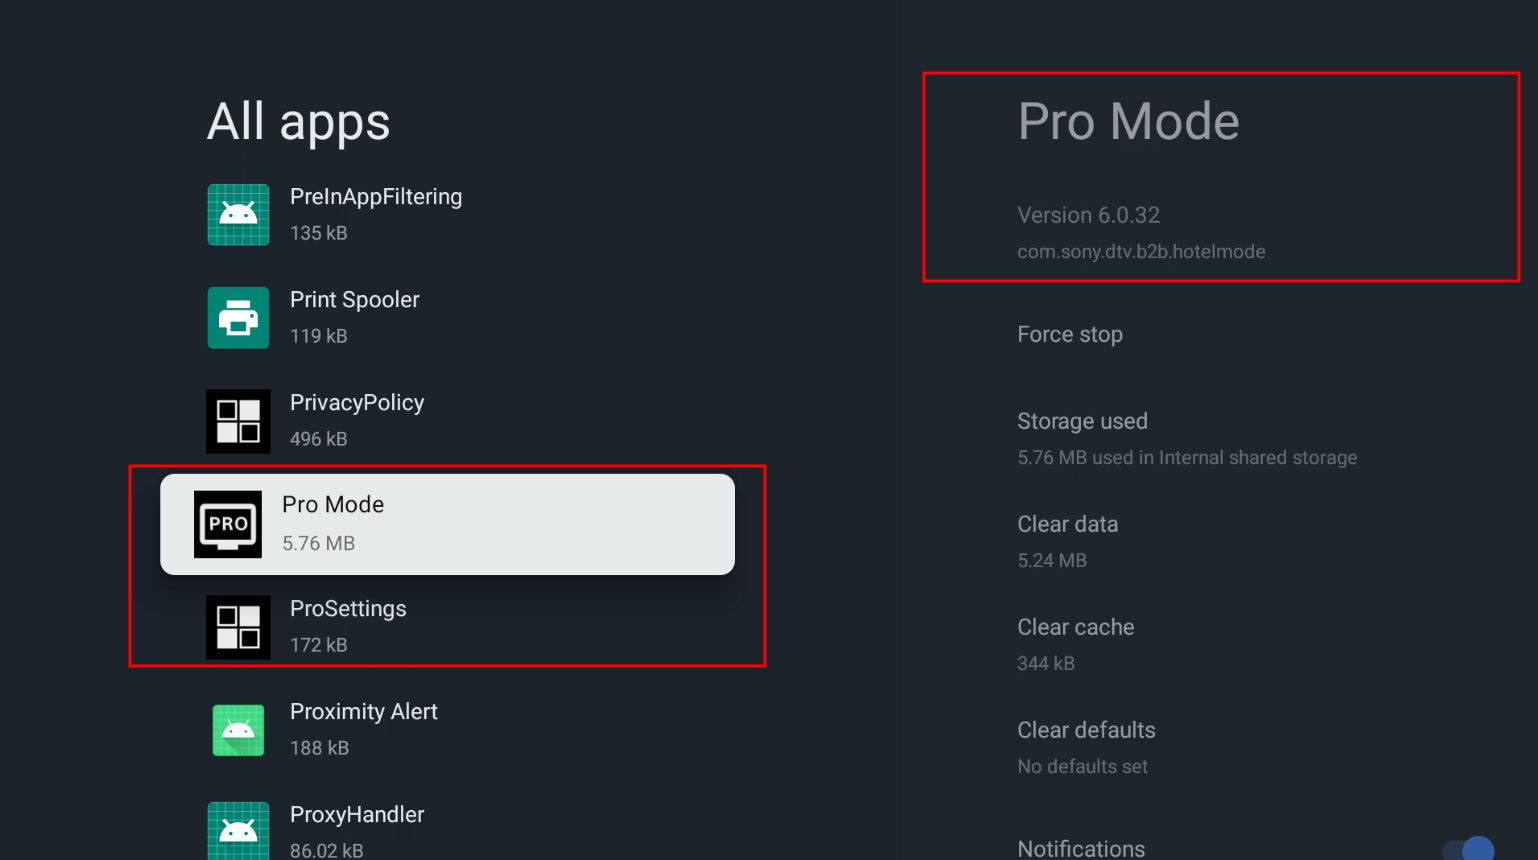
Now we can check if your TV is supported by checking to see if "ProMode" and "ProSettings" is installed or not in your "All apps" section in your settings menu.
On your TV go to the settings app and in order go to:
- Apps
- See all apps
- Show system apps
Then in the list, look for the app called "Pro Mode" it will have this under the name on the right -> com.sony.dtv.b2b.hotelmode
If you see under it or in the "All apps" list somewhere, there should be another item called "ProSettings" and it will have this under its name on the right -> com.sony.dtv.b2b.prosettings, and if so, then your TV should be supported. Example below.
Side note: you also don't need to be signed into a google account to do this.
Getting ADB debugging Enabled
To enabled Developer Options we can do this in order in settings again:
Turning on ADB debugging
Now to actually turn ADB debugging on follow these steps:
- Go back one page
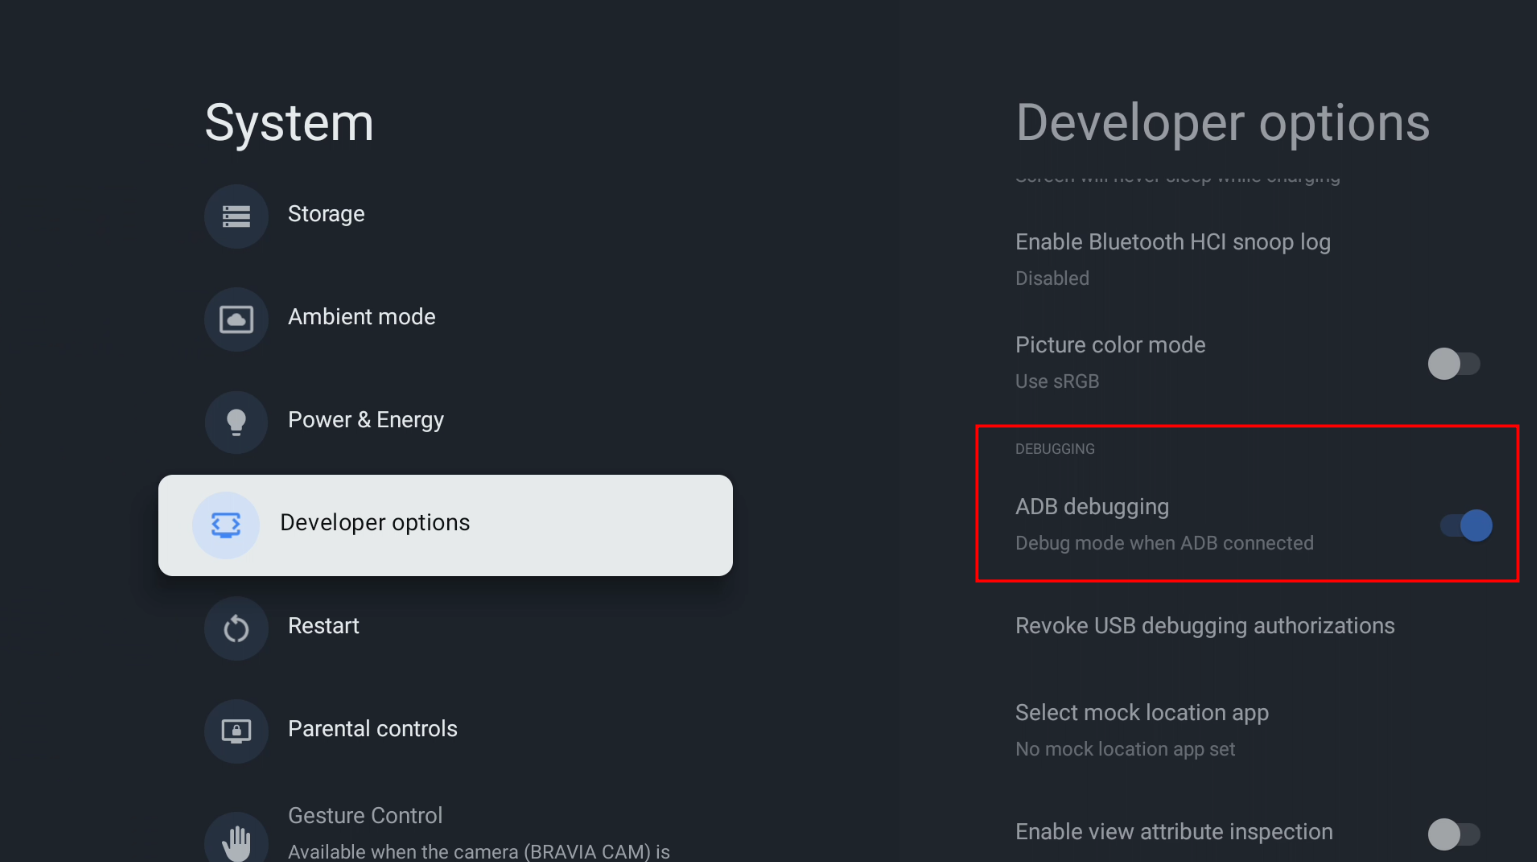
- Scroll down until you see the new option "Developer options"
- When you click on it, scroll down a little and you'll see the option "ADB debugging" and enable that.
Getting your TV's IP address
Now when we're ready to side-load our app, we need to use adb but it requires the TV's IP address to connect to it so to get it you do this in order:
- Go back to the settings main menu
- Network & Internet
- Hover over your network name that your TV is connected to
- On the right side it should say "IP address" note that down or remember it for later
Getting the software ready
On your computer follow these steps on a Windows based PC.
Installing 7zip
The first piece of software we need is 7zip, we can install it like this:
You can get 7zip here: https://www.7-zip.org/
Notes: You need to download to correct one for your system. For me and Modern systems, it is the "64-bit x64" one at the top. You should only get the "32-bit x86" one if your system is quite old (Like a decade or more) and even then that's a "maybe". You should get the ARM version if you're on an ARM-based computer..
Installing Python
We also need to install Python. Python is a programming language and we need it to be able to use the scripts we're going to use later which are from the LineageOS project.
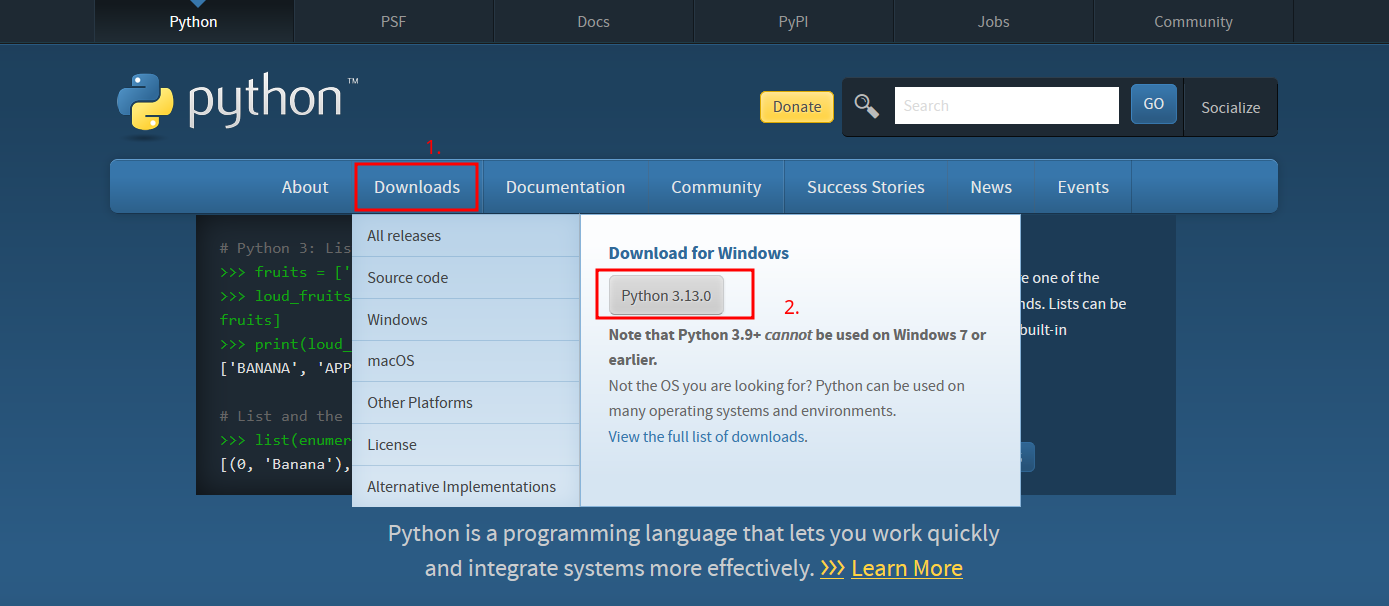
You can get it here: https://www.python.org/
Notes: hover your mouse over the download button at the top and click the download button for the python version listed. At the time of writing this it's "3.13.0".
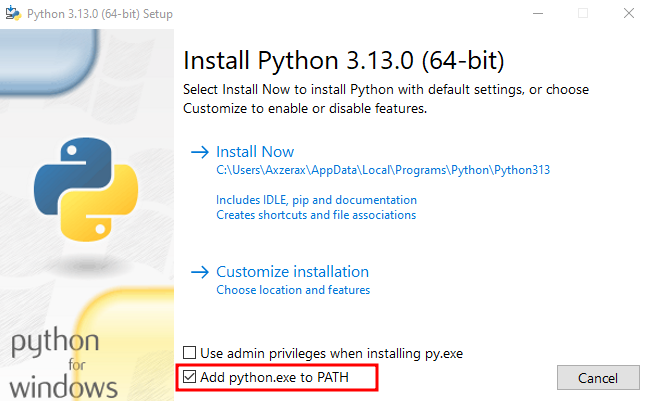
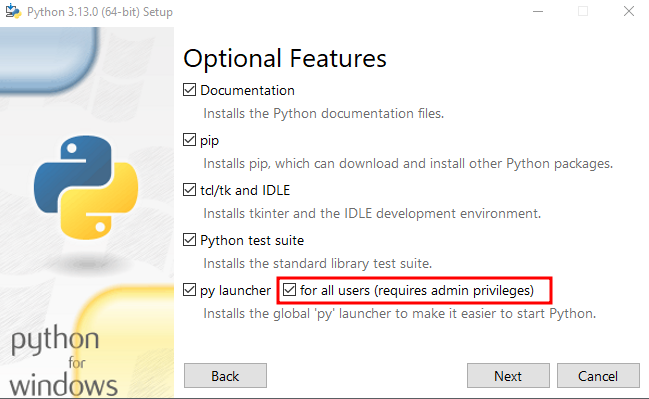
Instructions: After you download it, open the .exe that got downloaded and at the install menu click the option at the bottom to "Add python.exe to PATH". Then click "Customize installation" and make sure the option "pip" is checked and "for all users (requires admin privileges)" is checked (I had errors without doing that when installing) then click "Next".
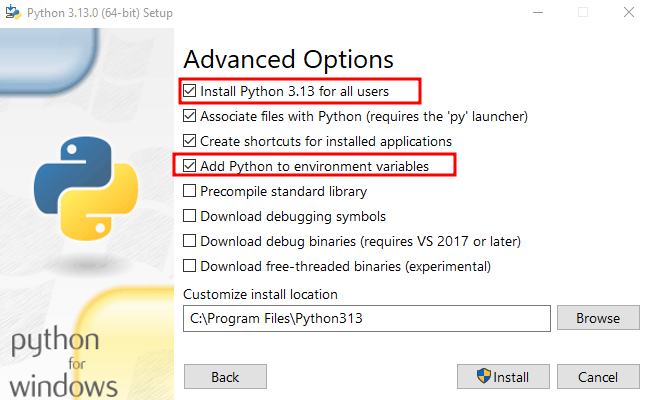
On the "Advanced Options" page make sure "Add Python to environment variables" is checked and "Install Python 3.13 for all users" is also checked (The 3.13 part is whatever version you downloaded). Then click "Install", it will ask for permission and wait for it to finish. After it says "Setup was successful" you can close the window. You can also now delete the setup file for python if you want.
Download page:
Add to PATH:
For all users:
Install for all users, add to environment variables:
Getting the firmware extraction scripts
Now we need to get the scripts to help us extract the "payload.bin" file (the firmware).
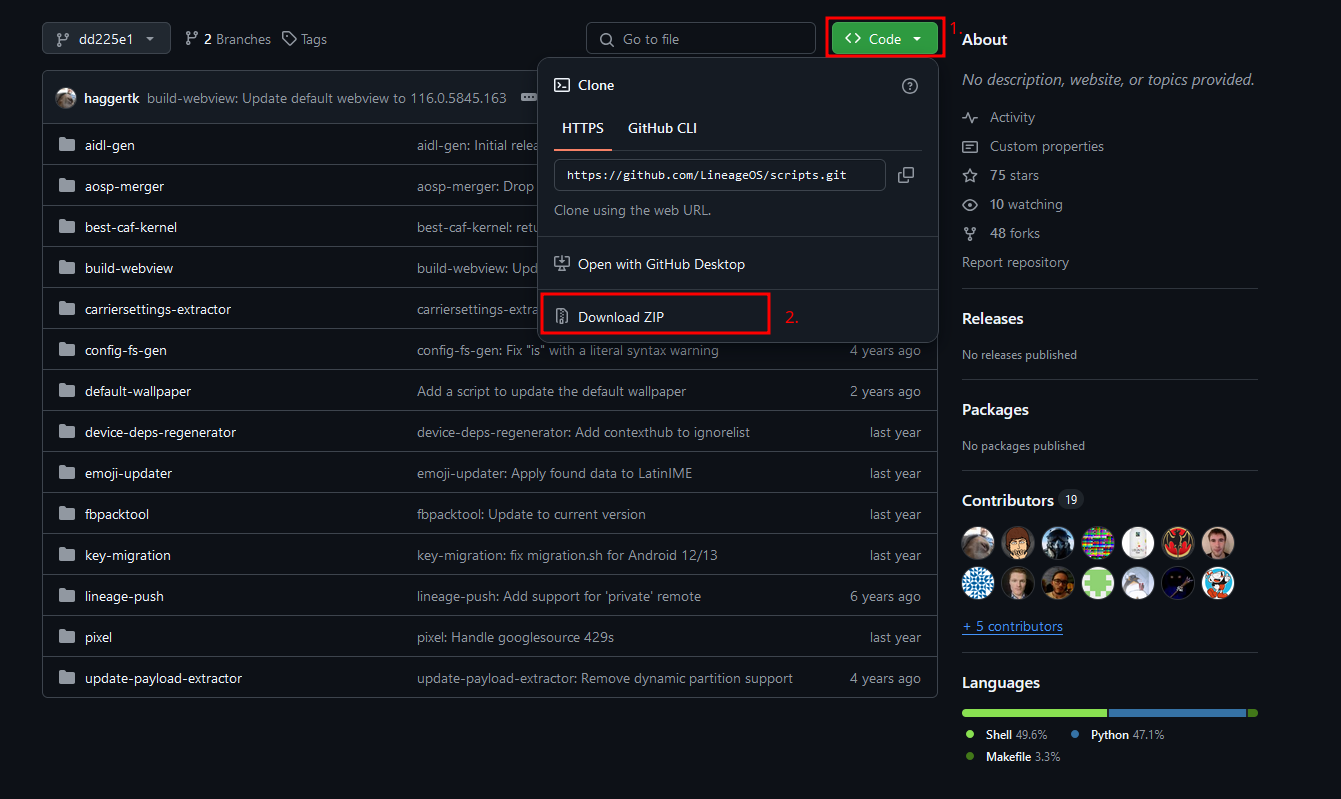
You can get these from GitHub here: https://github.com/LineageOS/scripts/tree/dd225e1cebc81f693ac1b981ac853cf819321b49
Instructions: Click the green "<> Code" button at the top then click the "Download ZIP" button for it to download.
Getting the firmware
We need to of course get the firmware to extract. The file will be about 2GB
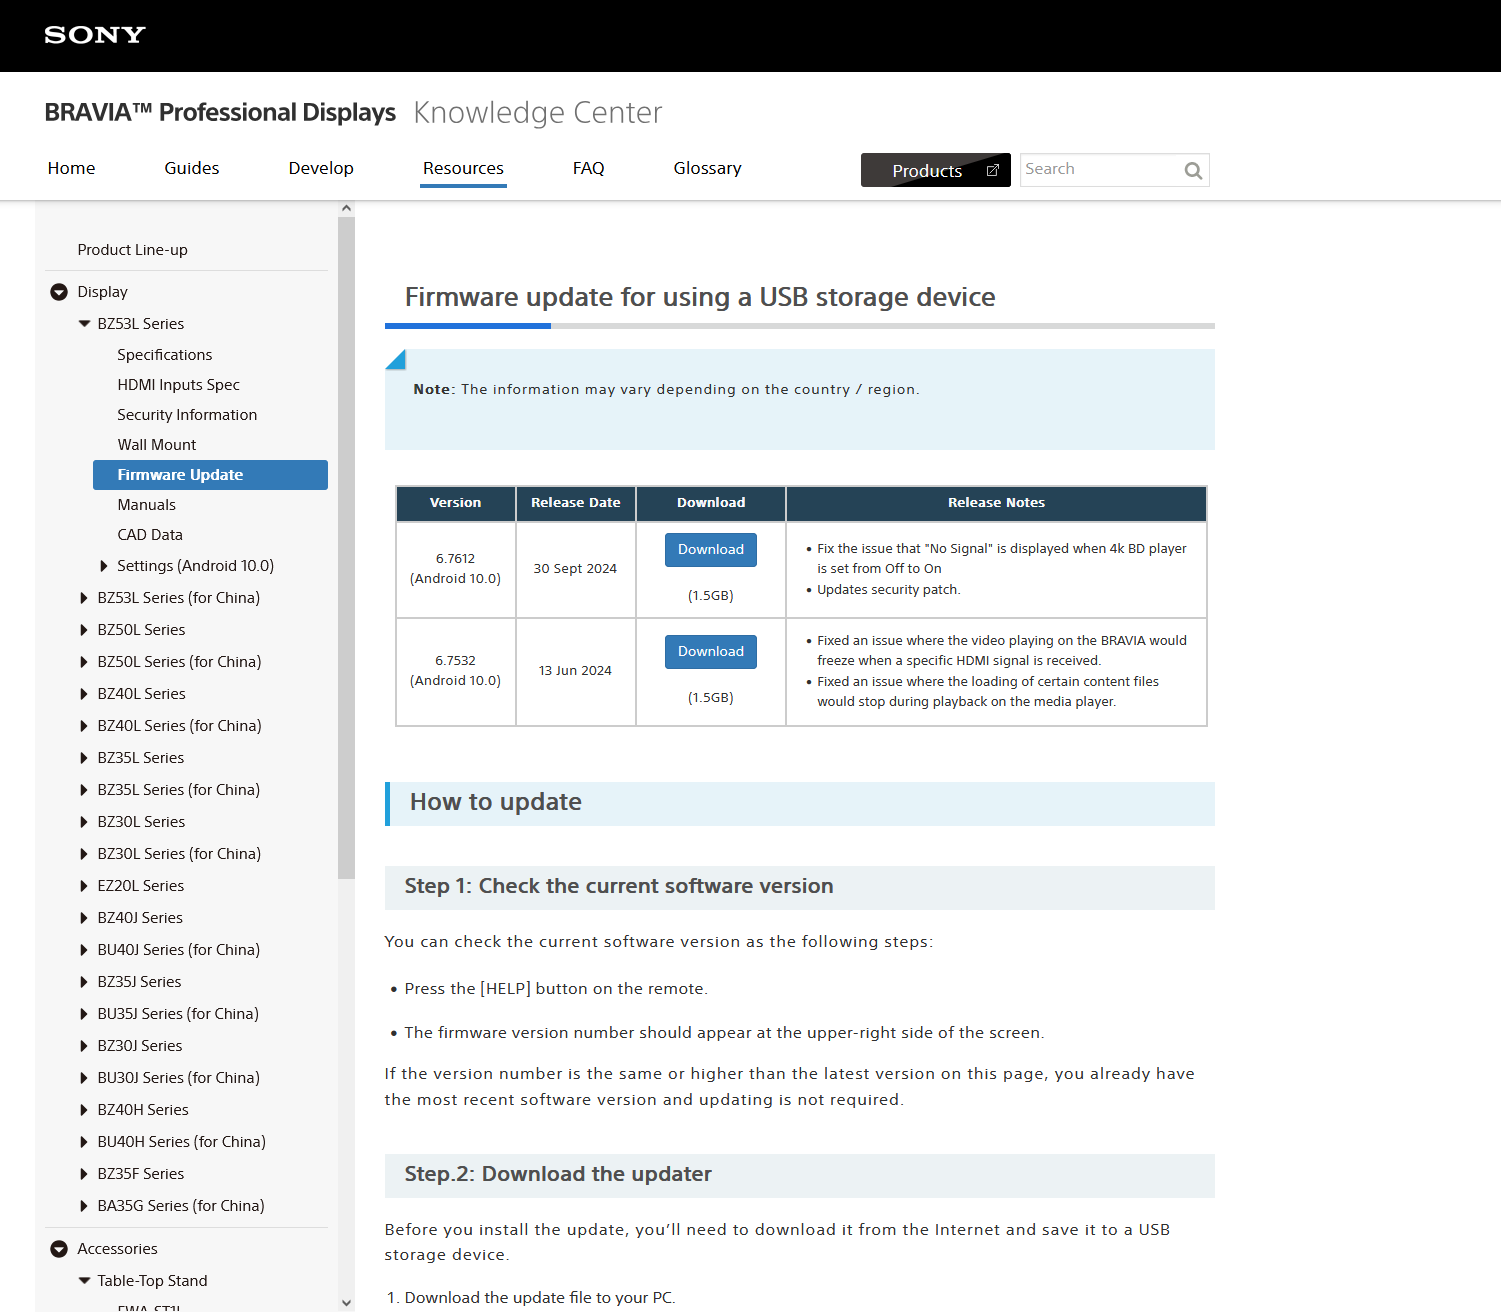
You can get it here: https://pro-bravia.sony.net/resources/display/bz53l-series/firmware-update/index.html
Notes: In the future if this firmware is no longer being updated, get a firmware that's supported to get the latest versions.
Instructions: We need to download the latest version available, at the time of writing this it's "6.7612 (Android 10.0)" with a release date of "30 Sept 2024". Click the download button for the latest release, then scroll down and click the download button again for it to start downloading.
Getting the APK
In this segment we are getting the APK from the firmware by extracting it.
Getting ready to extract the firmware
Extract the firmware zip files
Before we can do anything, we need to extract the "payload.bin" file from the .zip file we downloaded for the firmware.
The firmware that was downloaded should be named something like "sony_atvotafull" at the start. Now we need to extract the actual firmware file, open the .zip file and extract the other .zip file in it which is named something like "sony_dtv" at the start with a bunch of numbers and letters after that.
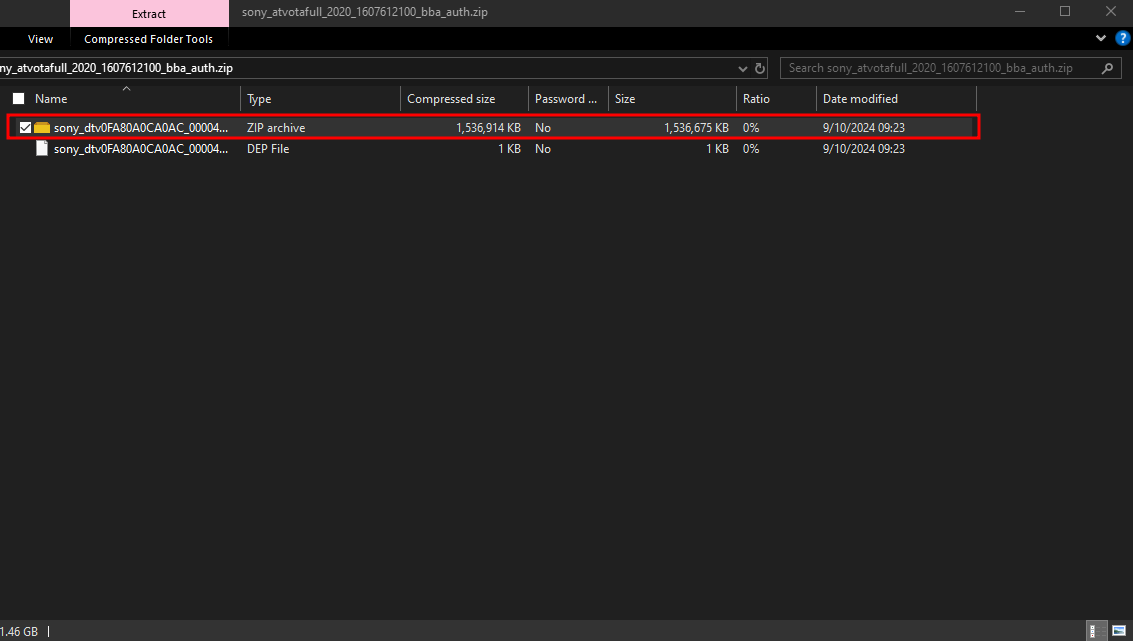
Now if you want you can delete the original .zip file which for me was named "sony_atvotafull_2020_1607612100_bba_auth.zip" should look similar to that.
Let's make a folder called output or firmware so we can be organized.
Now we can open the new .zip archive and extract the "payload.bin" file which is the actual firmware file. Extract it to the output folder we made earlier.
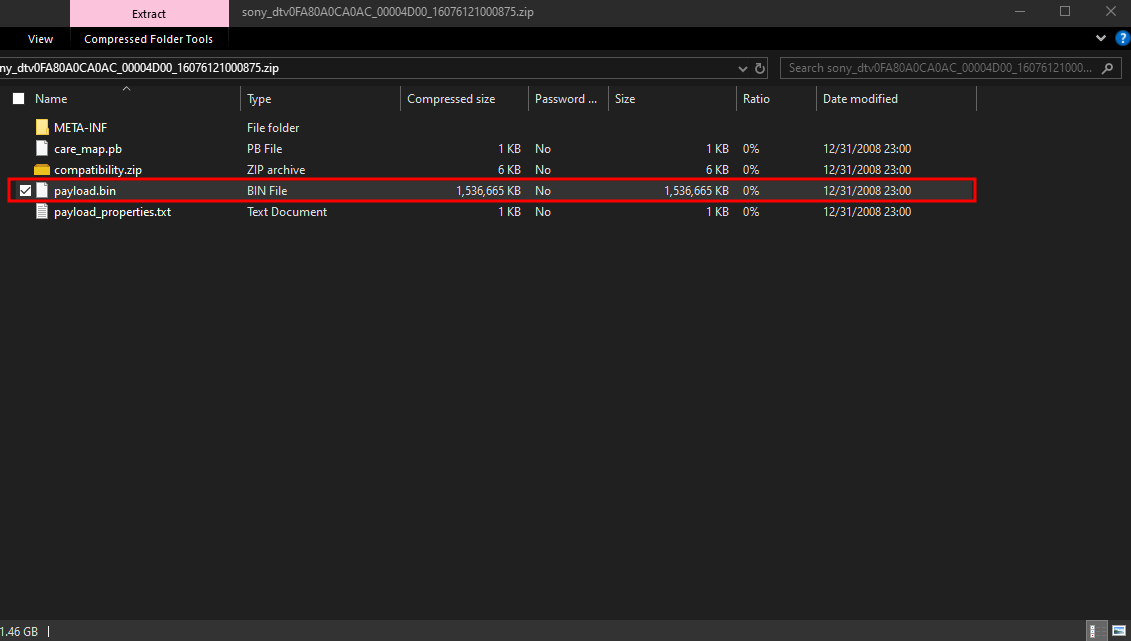
Now we can delete the 2nd .zip file which was for me "sony_dtv0FA80A0CA0AC_00004D00_16076121000875.zip" but it should look similar for you as well.
Getting the scripts ready
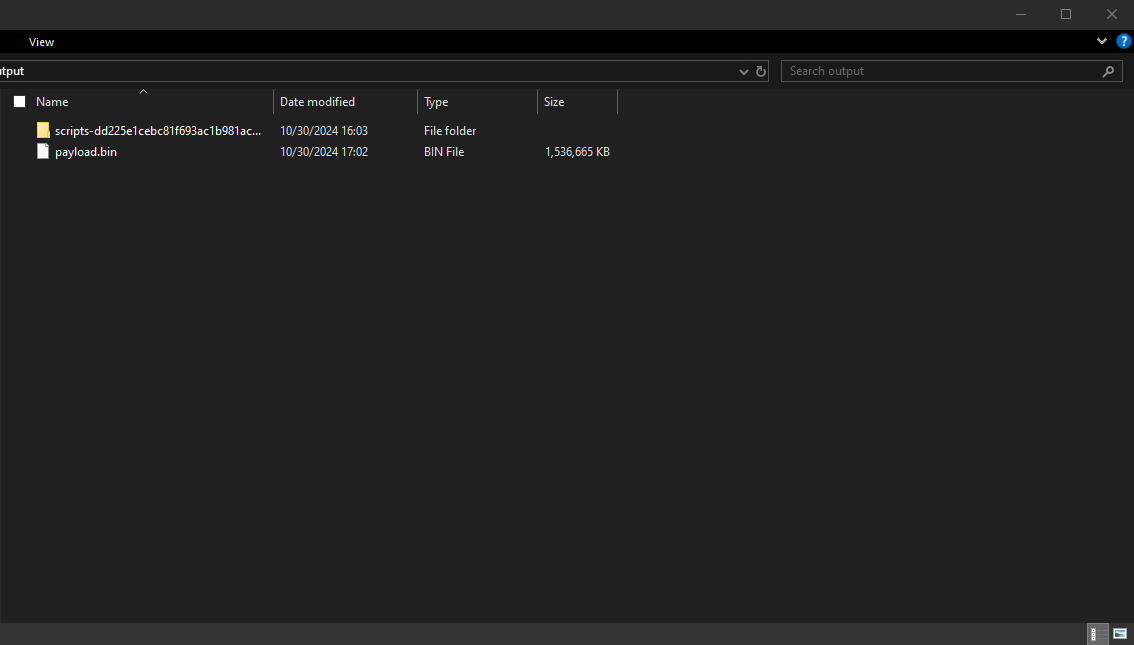
Now the scripts we downloaded earlier from GitHub, let's now extract that to the output folder as well. It should be named:
"scripts-dd225e1cebc81f693ac1b981ac853cf819321b49.zip"
We can also delete the scripts .zip file we just extracted since we extracted it to our output folder already.
This is what it should look like now in our folder.
Getting the python modules installed and our VENV ready
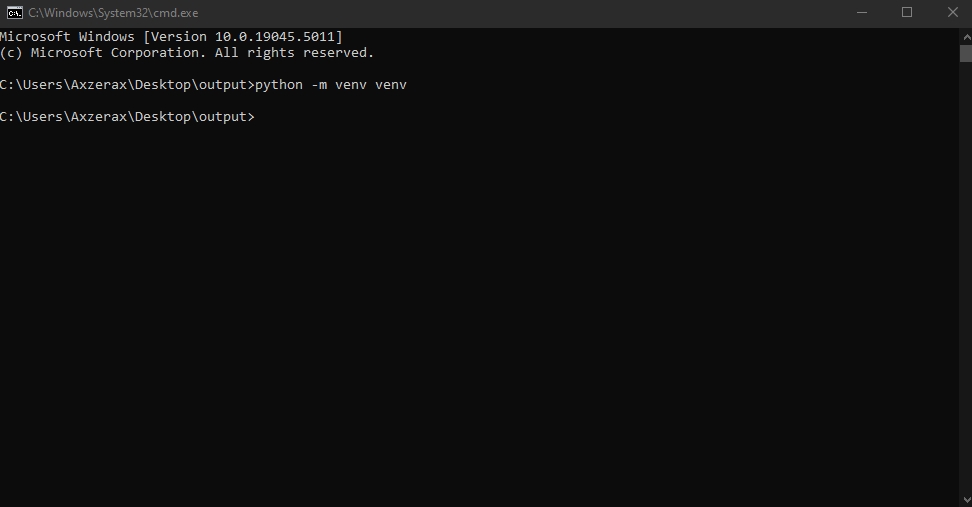
If you open the folder that we made which we named output or firmware, in the top section where it says "output" or "firmware", click in it and type cmd.exe and press enter.
That should bring up a Command prompt in our current directory which is our folder we made.

Now we need to install some pip modules for the scripts we downloaded to work. So were going to make a "venv" (A Virtual Environment) so we don't need to install the packages globally.
So in the command prompt window type as follows: python -m venv venv
Then press enter and it should have made a new folder called "venv" in our folder which is great.
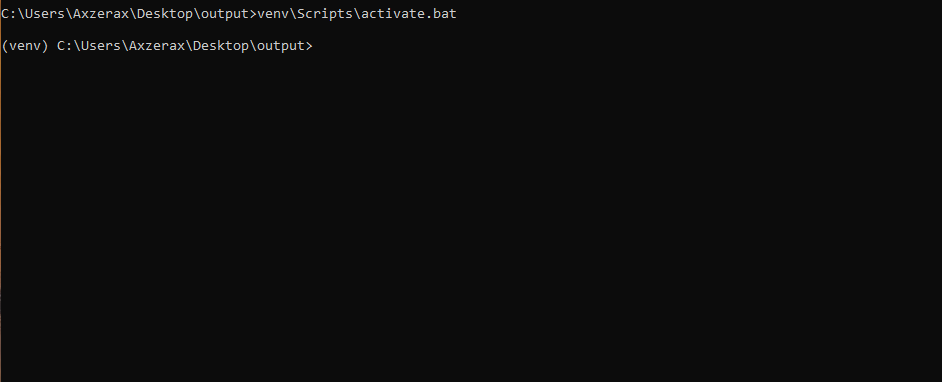
Now we need to activate our venv, so we can type in the command prompt window as follows: venv\Scripts\activate.bat
Then press enter, and you'll notice now it says (venv) on the left side to show you it's activated.
Now we need to actually install those modules I was talking about, so type as follows: pip install protobuf==3.20.1 six
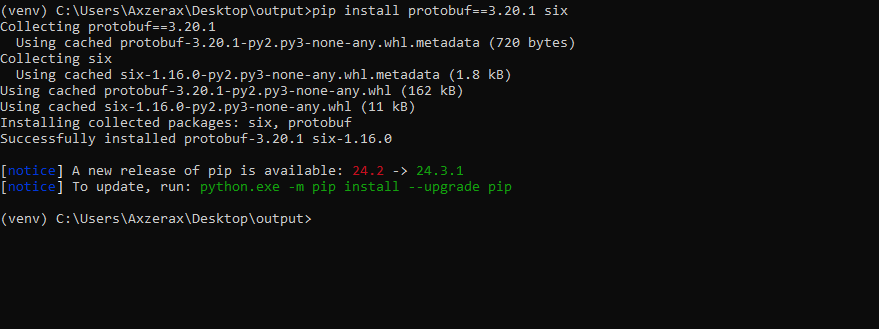
Once that finishes we are ready to extract the firmware.
Extracting the firmware
Extracting the "system.img" partition
In the command prompt window type this as follows to extract the "system.img" partition from the firmware file we downloaded.
Also when typing this below, you can press the "tab" key to autocomplete the names of the files and directories like the scripts folder name.
python scripts-dd225e1cebc81f693ac1b981ac853cf819321b49\update-payload-extractor\extract.py payload.bin --output_dir partitions --partitions system
This may take some time depending on your system.
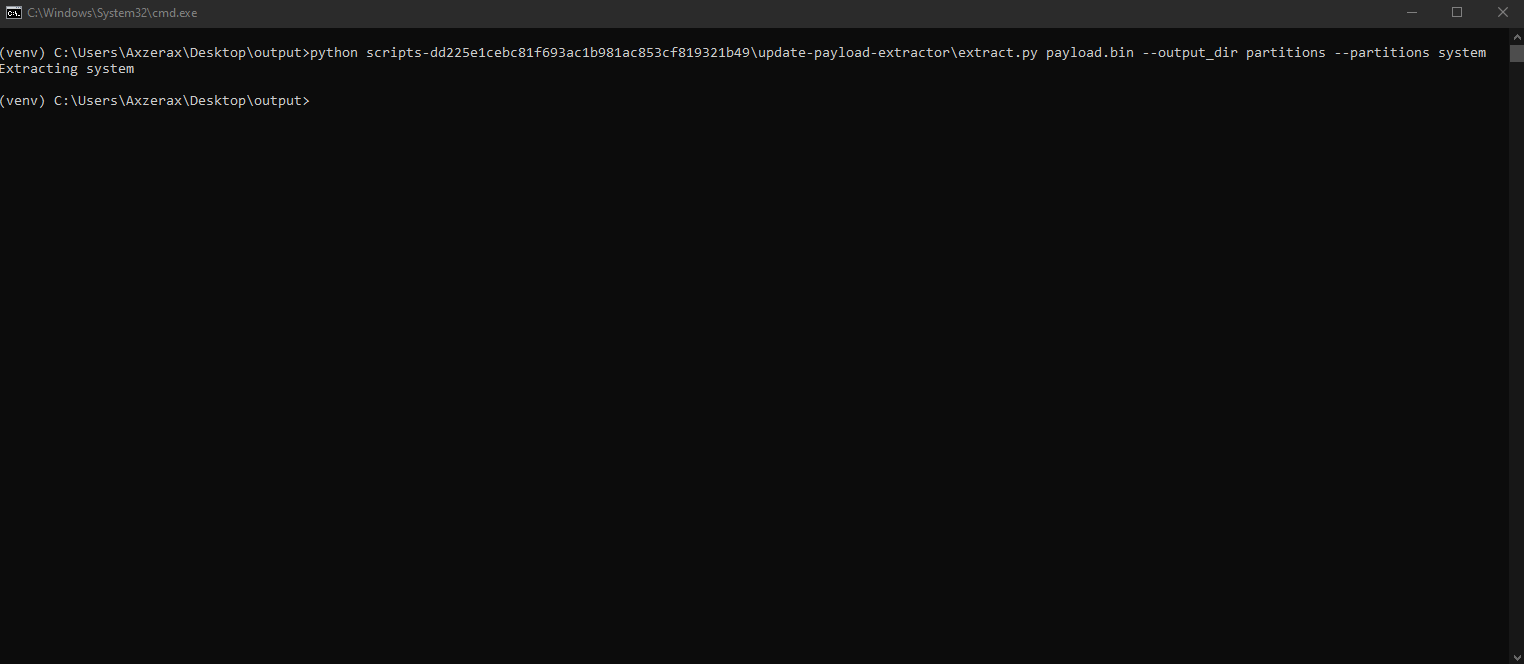
Once it finishes you'll notice we now have a new folder called "partitions" and that's where our extracted partition is located.
Go into the new partitions folder, the "system.img" file is not really the system.img file it's actually like a zip archive with no compression (or a .tar file) and we need the actual system.img file which is inside of it. That's why we downloaded 7zip at the start.
So now open the system.img file with 7zip, we can do this by right clicking on the file and clicking "7zip" -> "Open archive"
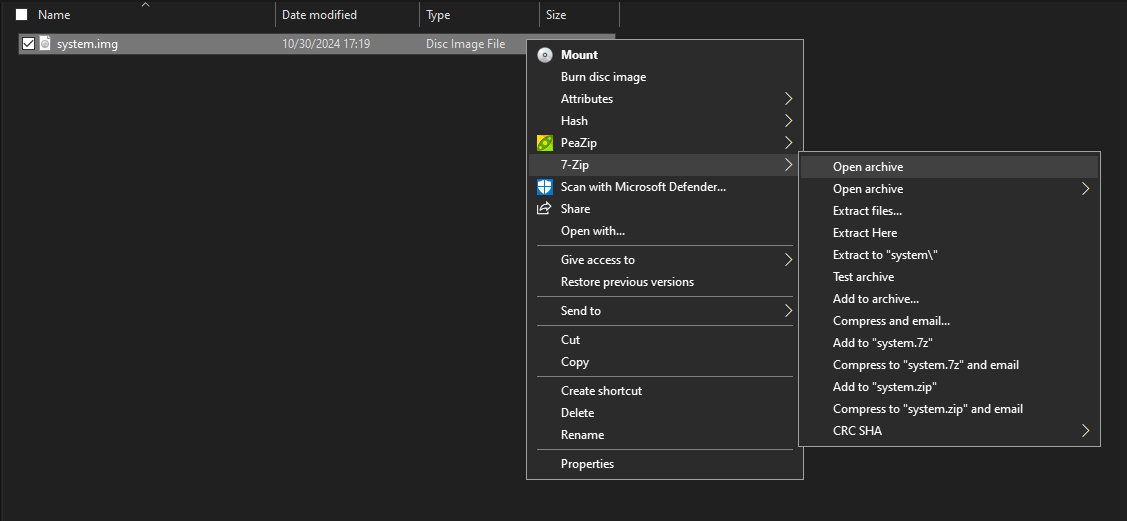
Once that opens you'll notice there's 3 .img files but we only need the "system.img" file.
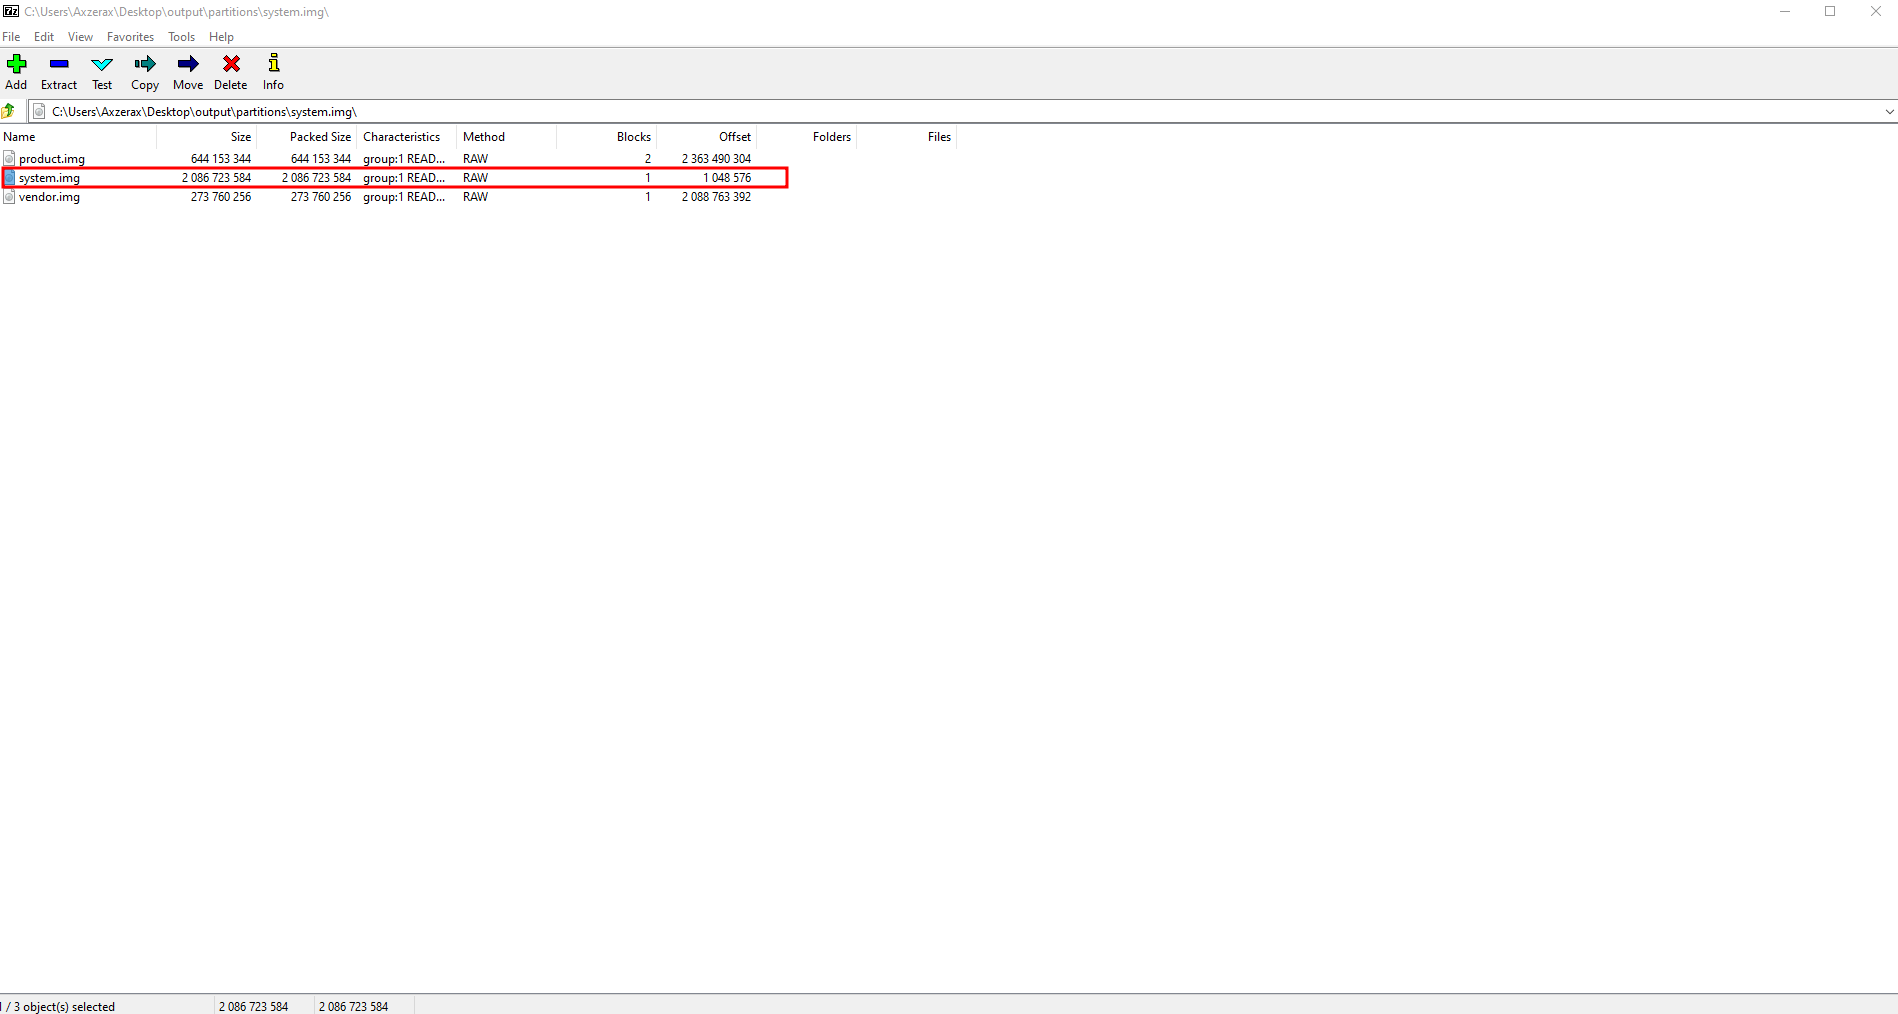
So you can move the system.img file in the system.img file partition to the root of our output folder (Where we have all our folders in the output folder and our payload.bin file) or even your desktop. (Whatever one you like)
Getting the APK
Getting "ProModeTool.apk"
Now we need to open our new system.img file that we just copied out of the system.img partition file. We need to do the same thing as earlier and open it with 7zip.
It should look like this.

Now go into the "system" folder in the list -> then the "priv-app" folder.
Now scroll down until you find the folder named "ProModeTool". This is the item that Sony removed from consumer TVs so that people can't use ProMode.
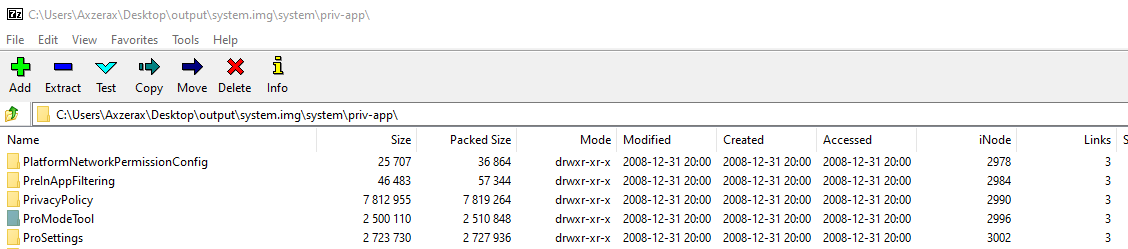
Once you find that, drag it out to somewhere like your desktop.
Now you can close Command Prompt, 7zip.
You can also uninstall python, and 7zip if you want since we're finished with it and you can also delete the output folder or firmware folder we made, just make sure you don't delete the "ProModeTool" folder.
Now we have to side-load that to our TV with ADB that we enabled earlier.
Installing the ProModeTool.apk app
This chapter we will install the "ProModeTool.apk" file we just extracted from the firmware.
Getting ADB tools ready
Getting the android platform-tools
To install the apk file, we have now for "ProModeTool" we have to install it over ADB (Android Debug Bridge).
To do this you need to download the adb tool to your computer, instructions for both Windows and Linux are below.
Windows:
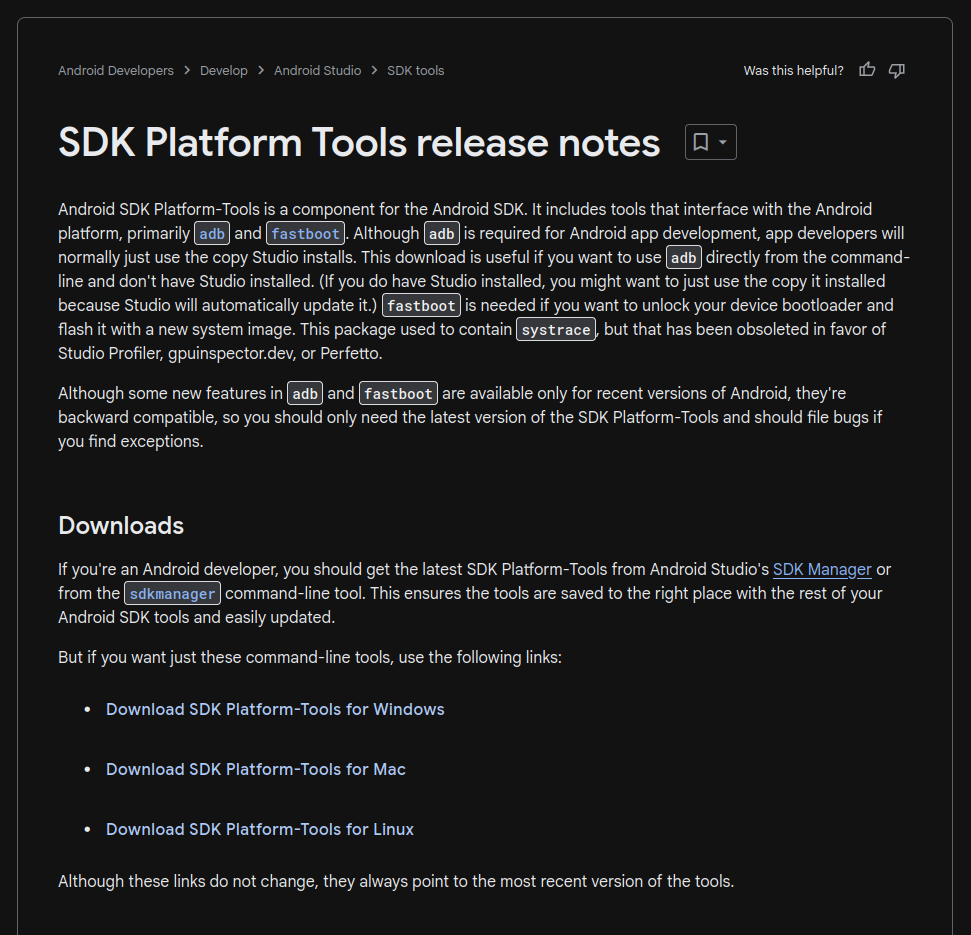
Windows: https://developer.android.com/tools/releases/platform-tools
Then click on the "Download SDK Platform-Tools for Windows" button under "Downloads".
Now that you have downloaded adb, we need to extract the .zip file for it.
After you extracted the .zip file you need to open a cmd prompt in the directory of adb like we did earlier when we opened Command Prompt to extract the fimrware in file explorer.
Linux:
Linux: You can install adb with your package manager for your distro.
All commands listed below, you need to type in your terminal for your distro.
For Debian/Ubuntu based systems: sudo apt update && sudo apt install android-sdk-platform-tools-common
For Fedora based systems: sudo dnf update && sudo dnf install android-tools
For Gentoo: sudo emerge --sync && sudo emerge -av dev-util/android-tools
For arch based systems: sudo pacman -Syy && sudo pacman -S android-tools
Ok now that we have adb installed we can continue to side load the application.
Installing the APK
Connecting to the TV
Now for both Operating Systems, the command is similar to each other.
First we need to connect to the TV over adb.
Windows:
Windows: Type this in Command Prompt: adb.exe connect Your-TV-IP (Replace "Your-TV-IP" with the TV's IP we got earlier.)
You may get a firewall notice to allow adb, you need to allow it. Example below.
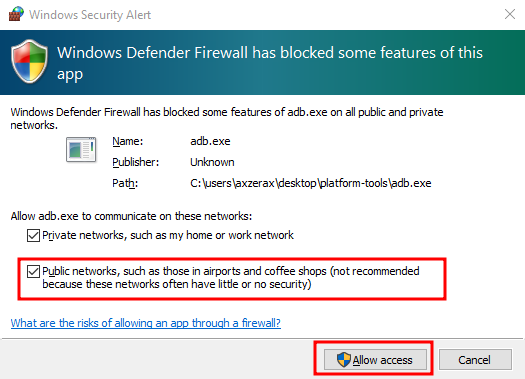
Linux:
Linux: Type this in your terminal: adb connect Your-TV-IP (Replace "Your-TV-IP" with the TV's IP we got earlier.)
You also may need to allow this in your firewall, you can search this up for whatever firewall you're using.
Allowing the computer to connect
Now it will say that it's starting it's daemon and not connect. So to make it connect, on your TV screen it will have a message on it, saying something like "Allow USB debugging".
You need to check the option to "Always allow from this computer" or it will keep coming up. Then click "ok".
Then type the same command above again and it should say something like "Already connected to <IP-of-your-tv>". Which means we are connected now, great!
Side-loading ProModeTool.apk
Now we can go ahead and side-load the .apk file for "ProModeTool". So to do this type this command in your terminal depending on your Operating System below.
On Windows: drag the folder called "ProModeTool" to the directory where adb is.
On Linux: Open your terminal to where the "ProModeTool" folder is or cd to that location.
Windows: adb.exe install ProModeTool\ProModeTool.apk
Linux: adb install ProModeTool/ProModeTool.apk
It should say "Preforming streamed install" and then it should return no errors when finished.
And that's it for installing the tool.
Starting ProMode and Permission Prompts
This chapter will explain how to start ProMode and any permission prompts that will come up or anything that you need to know in general.
Starting ProModeTool
Launching ProModeTool
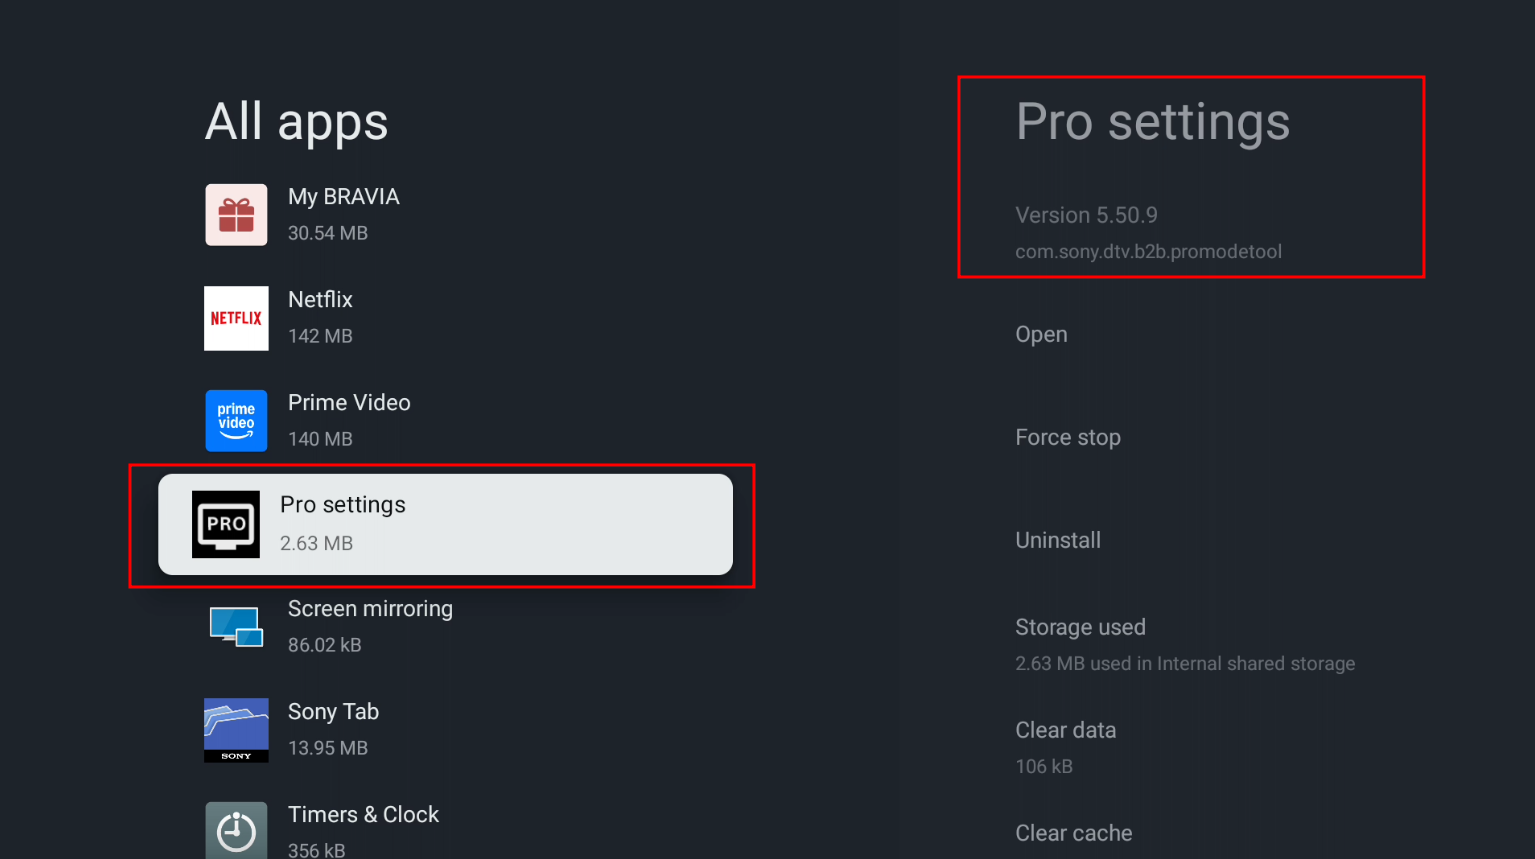
Now when you go back to your TV, if it's not on your home screen in the "Apps" section then go to your Settings -> Apps -> See all apps
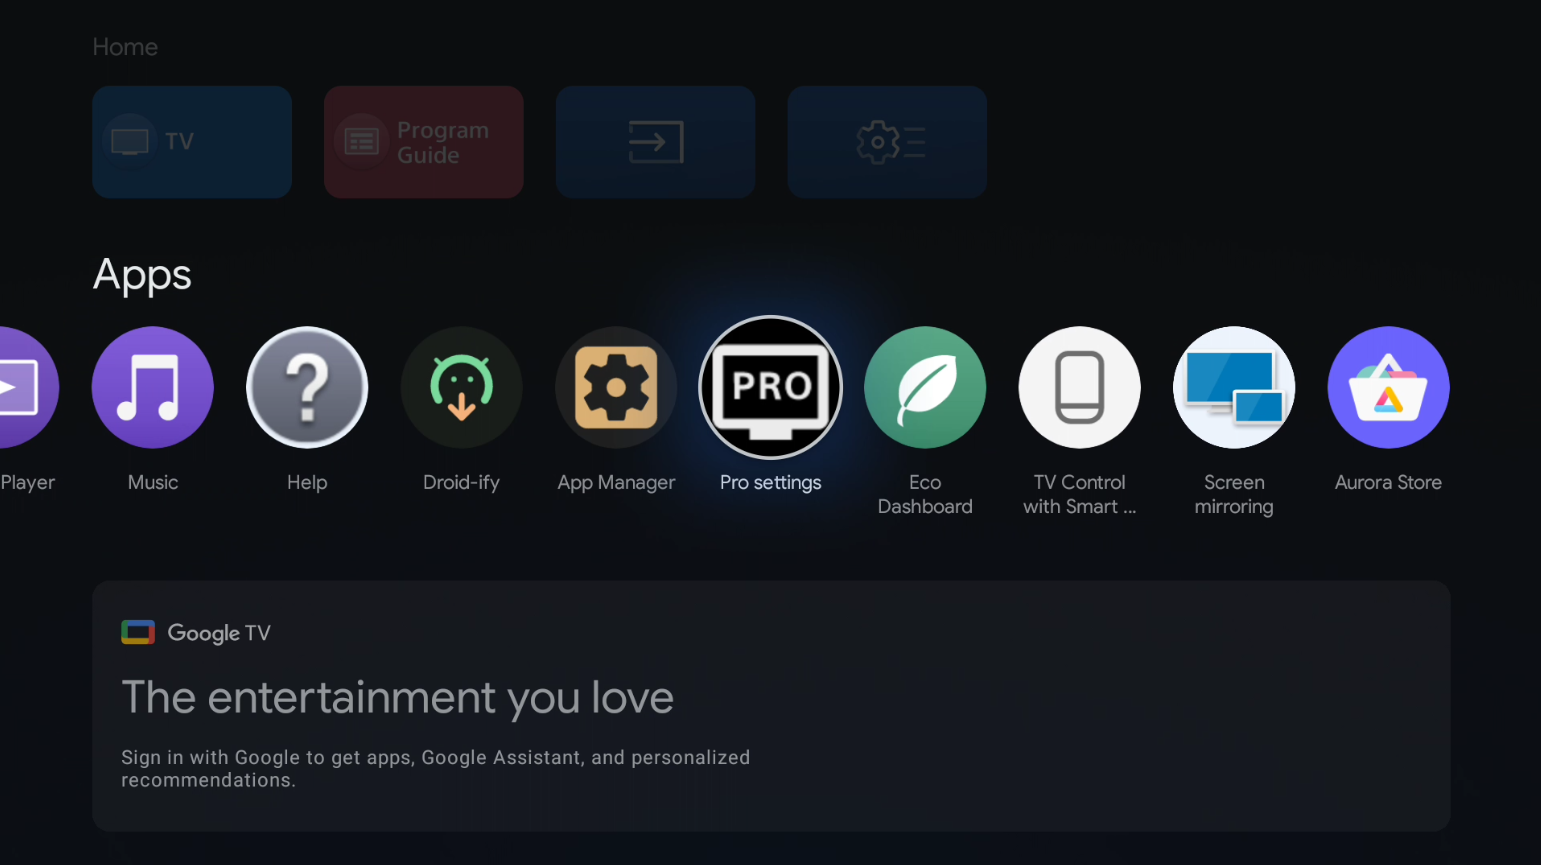
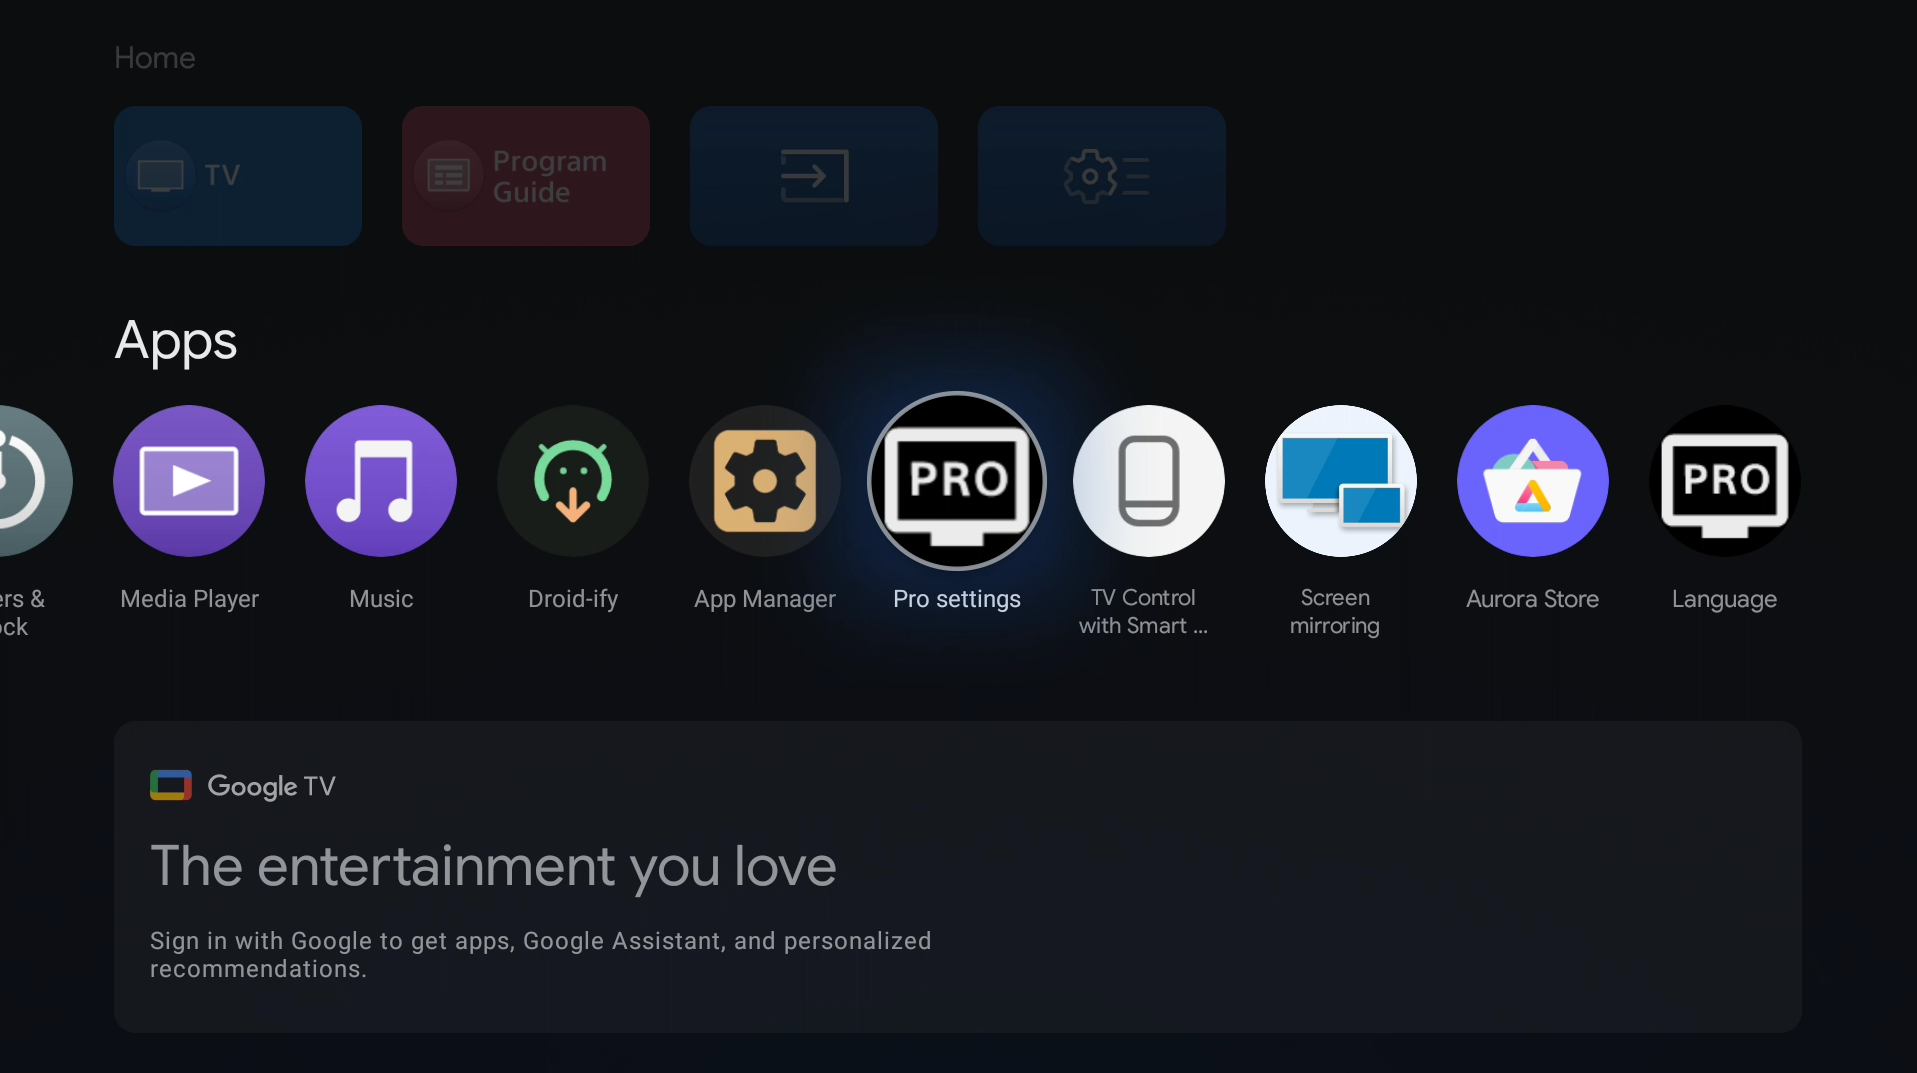
Then look for the tool we just installed. It should be named "Pro settings" (com.sony.dtv.b2b.promodetool) under the name on the right. You can open it from there or your home screen if you have it there.
On your Home screen:
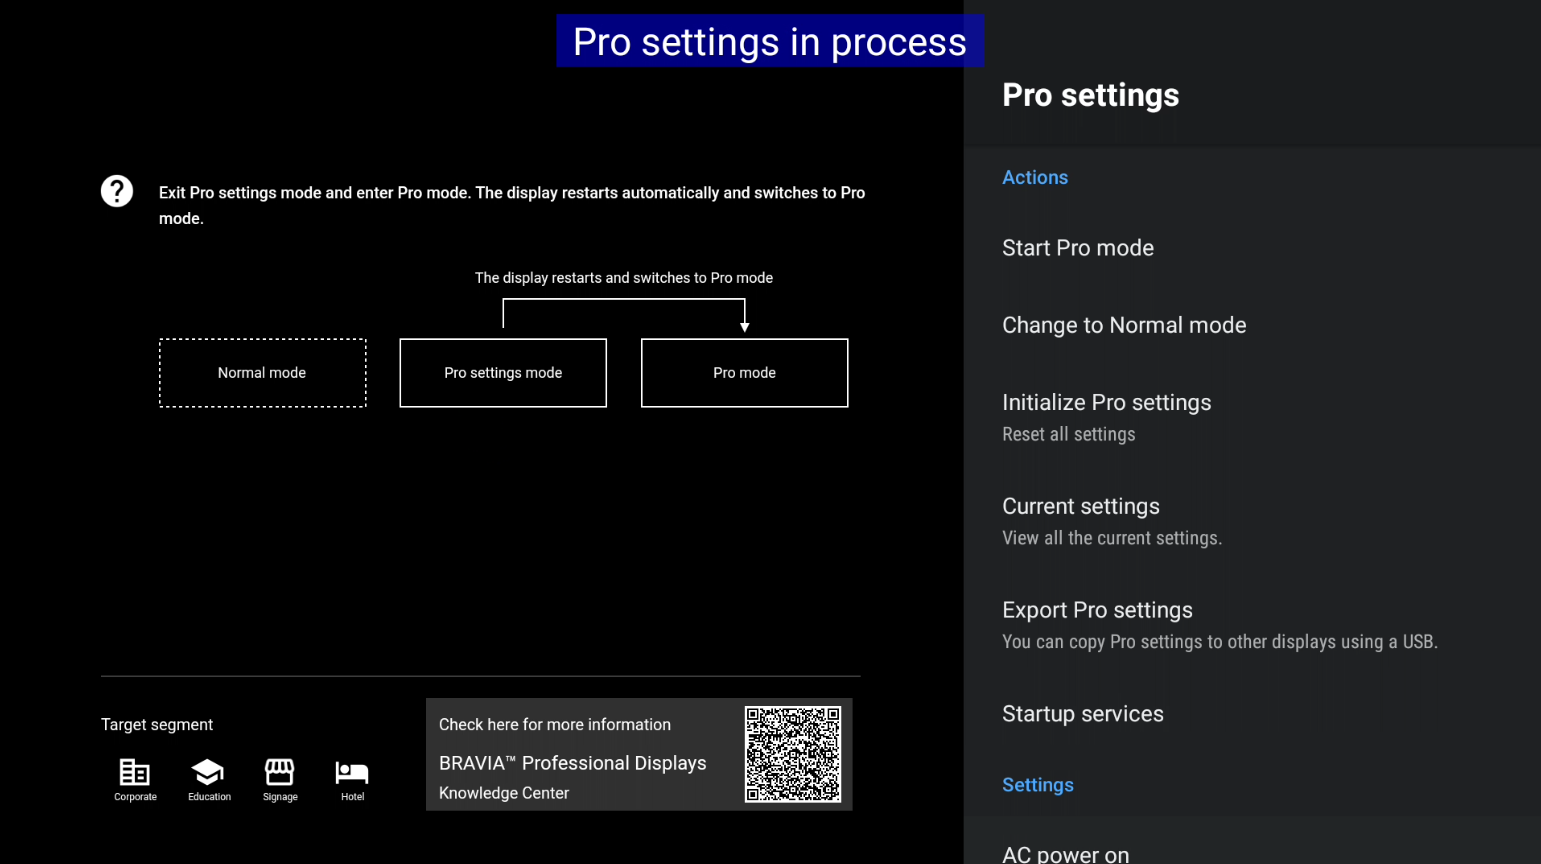
When you launch it you are met with some options but to start we need to go into "Pro settings mode".
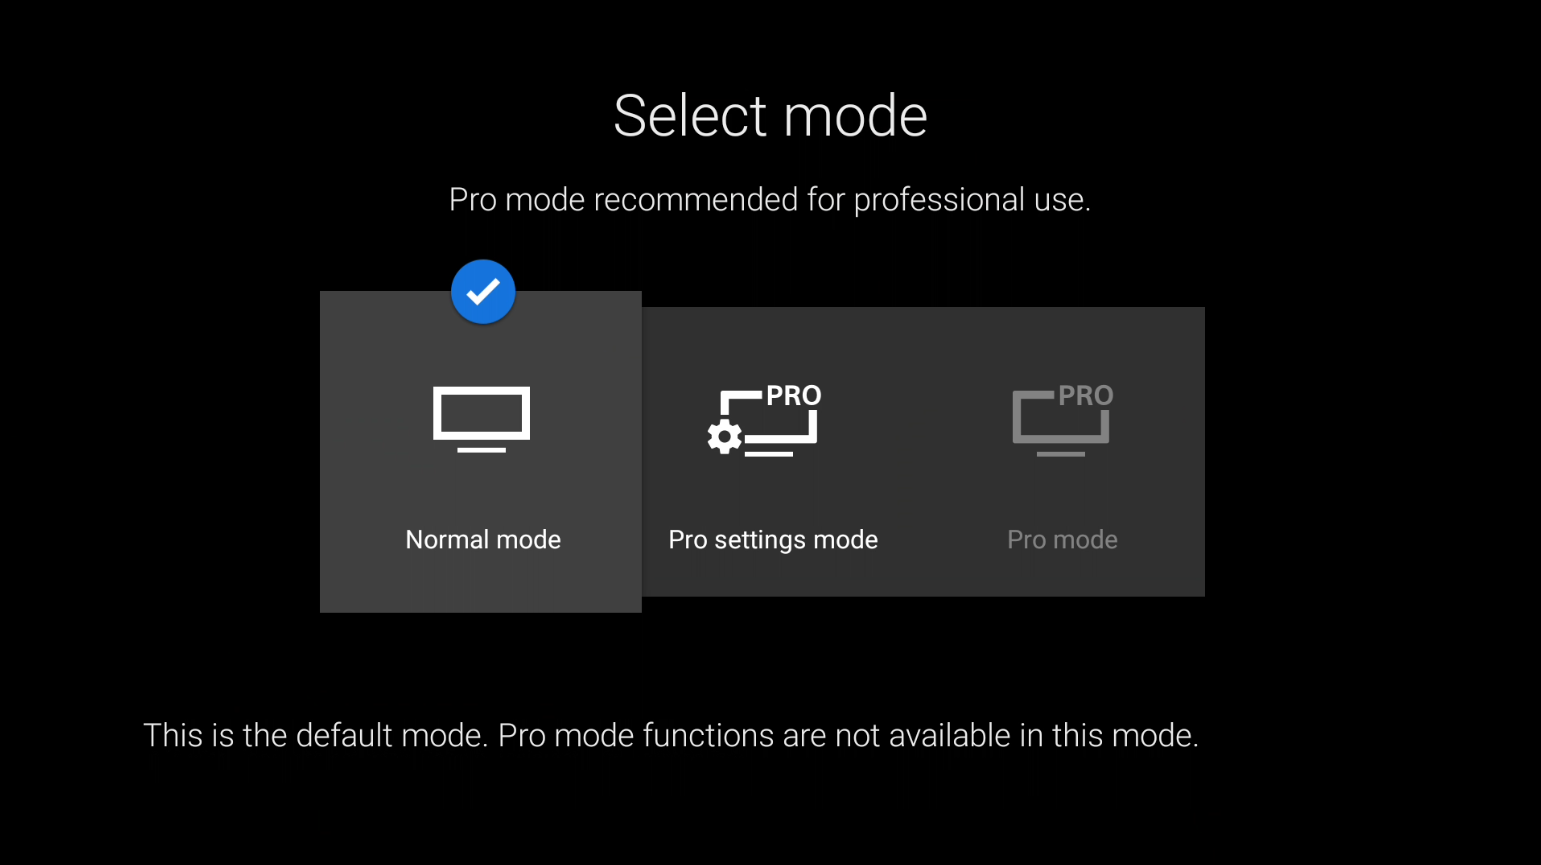
When you click on that mode and click ok to start that mode, you will see some permission prompts show up on your TV (For me it was 3 - 4 of them), you need to make sure you accept them all for it to work. For me it had a default app icon for the permission prompt, could be different for you, somewhat like this:

It may also show up with another thing asking "what do you want to open this app with" with the TV app in the list. Don't click any of them and just click on your back button on your remote once. Example:

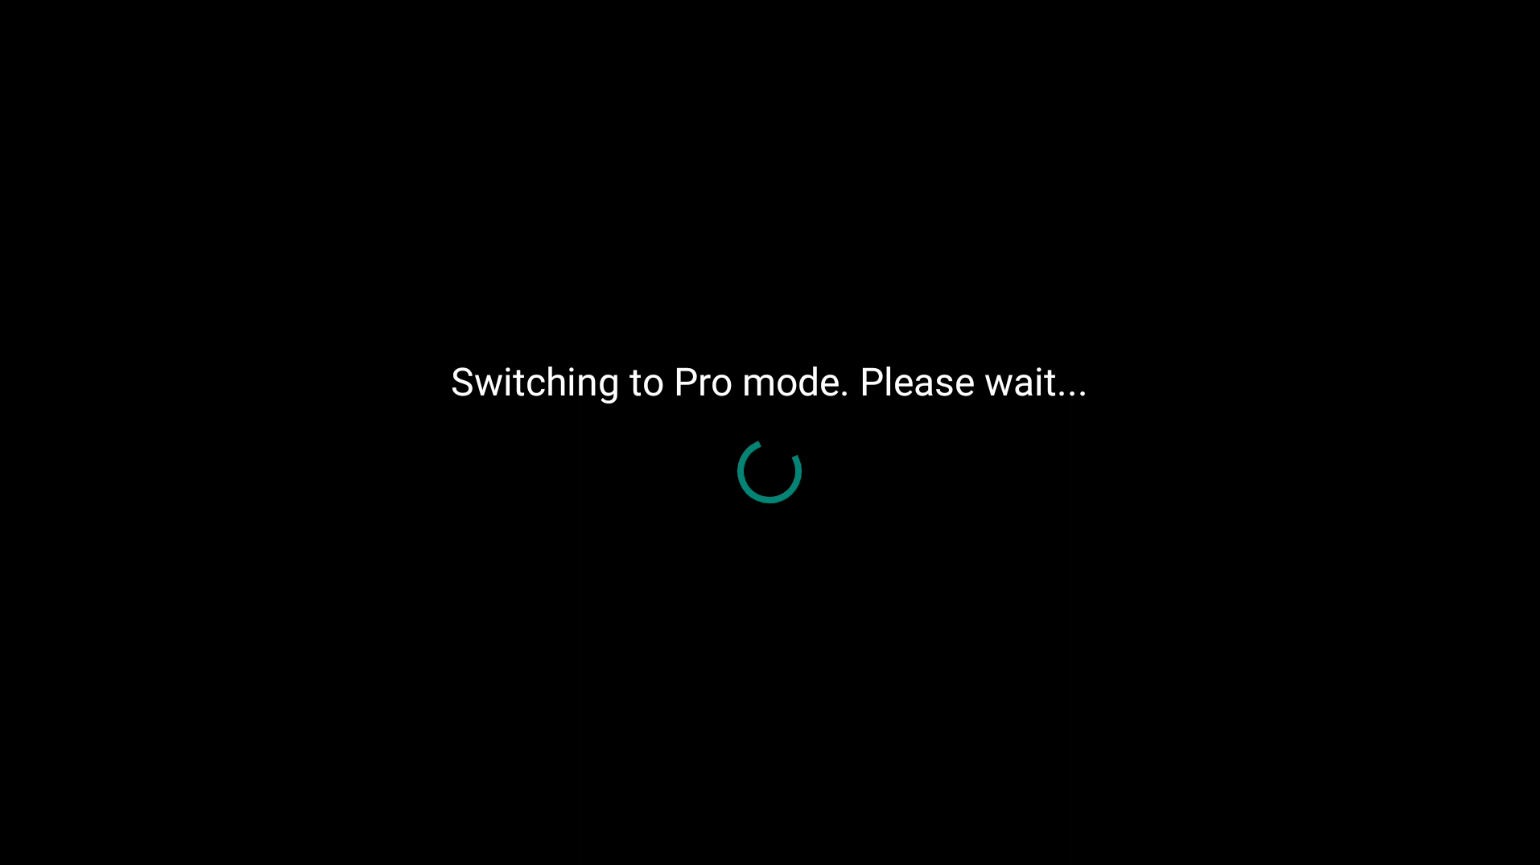
It may look like it's frozen or it's stuck loading or just a black screen. For me the first time I launched it, it took 30 seconds to 1 minute for it to say that it's "Restarting the TV". So I would wait at least up to 5 - 10 minutes at most before trying it again (If you do need to do that, make sure you close the app fully in settings).
Then you should be in the "Pro settings mode" and you can now do whatever you want with it, and if you want the full "Pro Mode", then go back in the app and click "Pro Mode" and let the TV restart again.
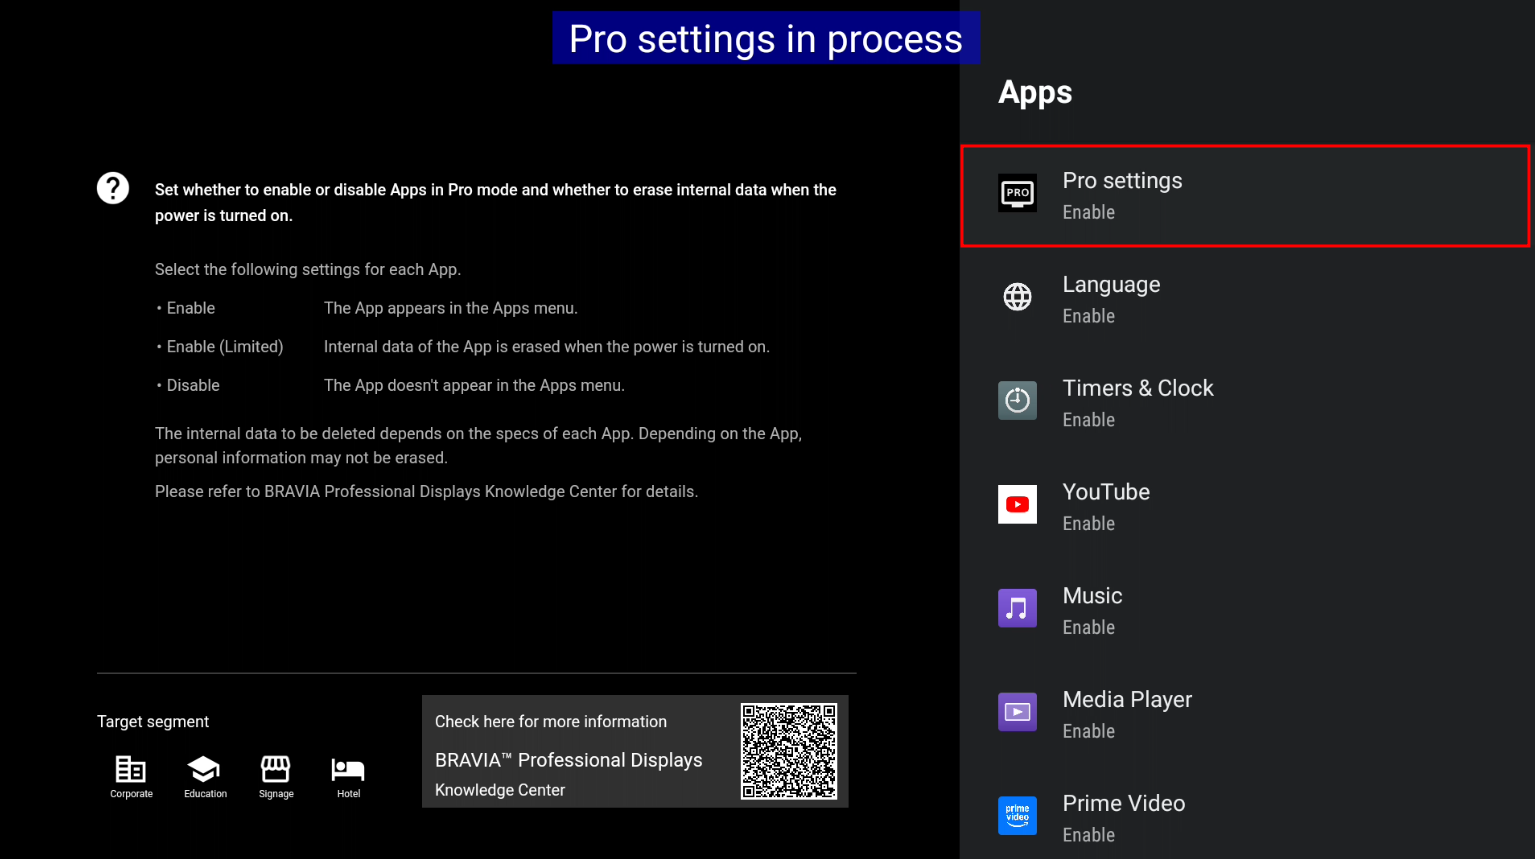
There's a new settings menu in the settings app as well.
ProSettings Home menu Example:

ProSettings Settings Menu Example:
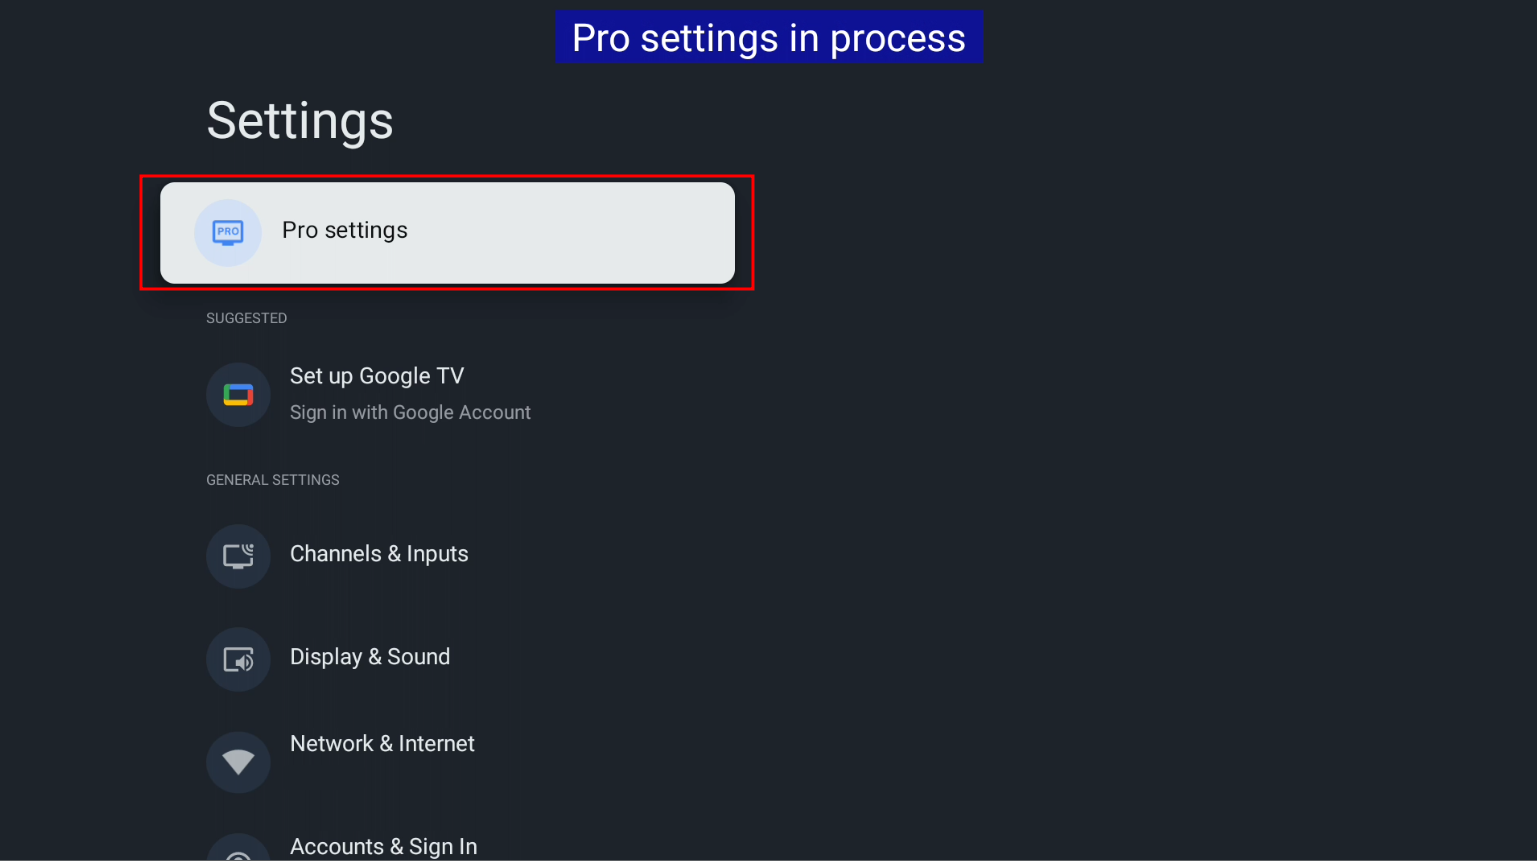
To access this, it's in your settings app at the very top.
Warning
This is a good time to say that you really should go to the menu in the settings app for the "Pro settings mode" and go to the allowed apps in "ProMode" and allow the "ProModeTool" so you can go back to the other modes since I'm not sure if you can without doing that.
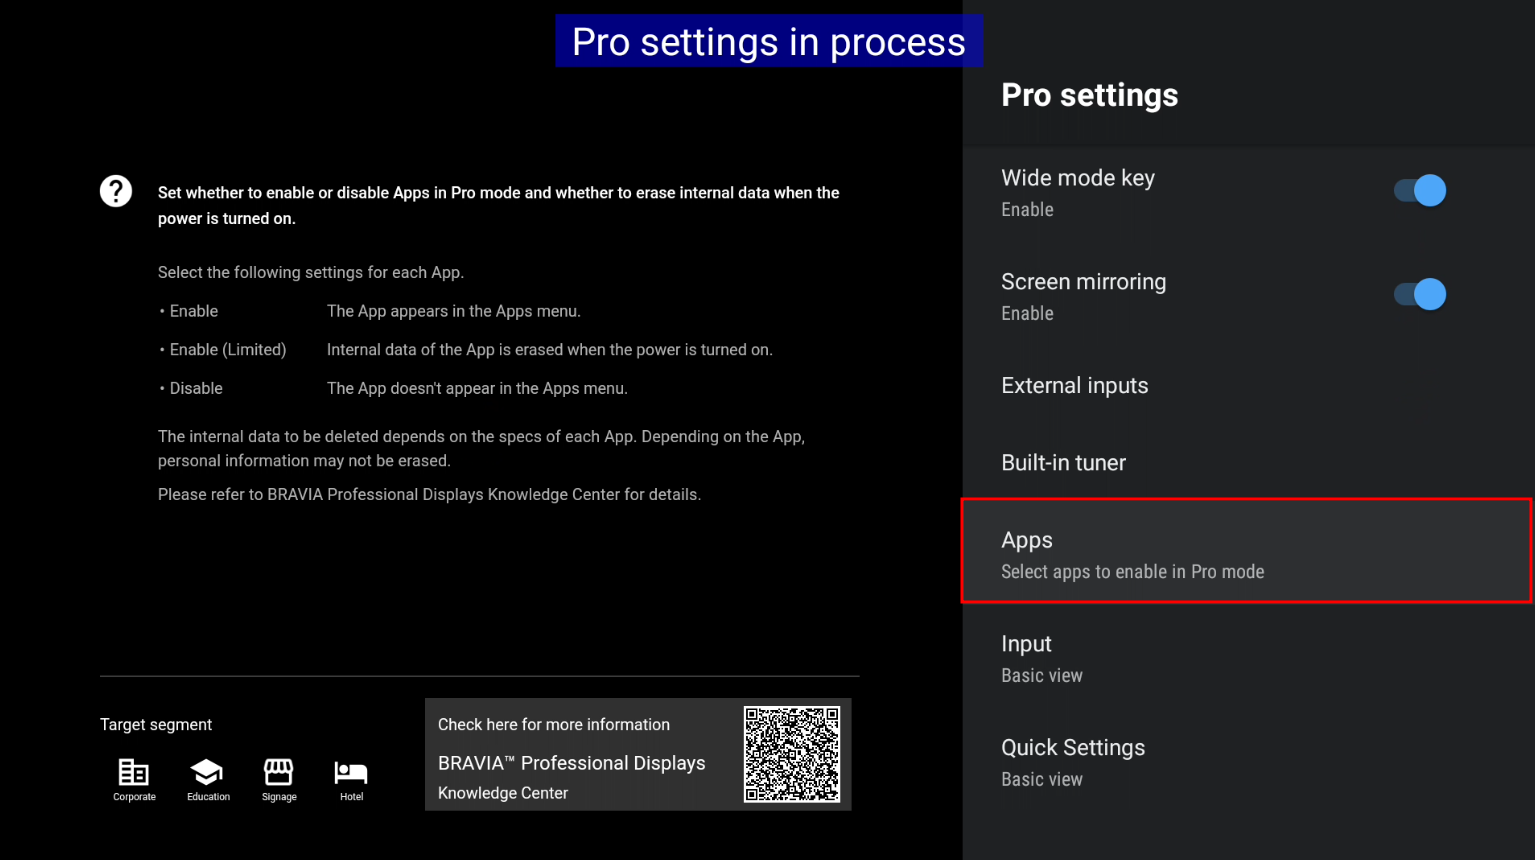
Make sure you enable it here:
Go back to the other modes:
You can go back to the other modes if you want to change settings, etc, by going back into the Pro Settings app and selecting the mode you want.
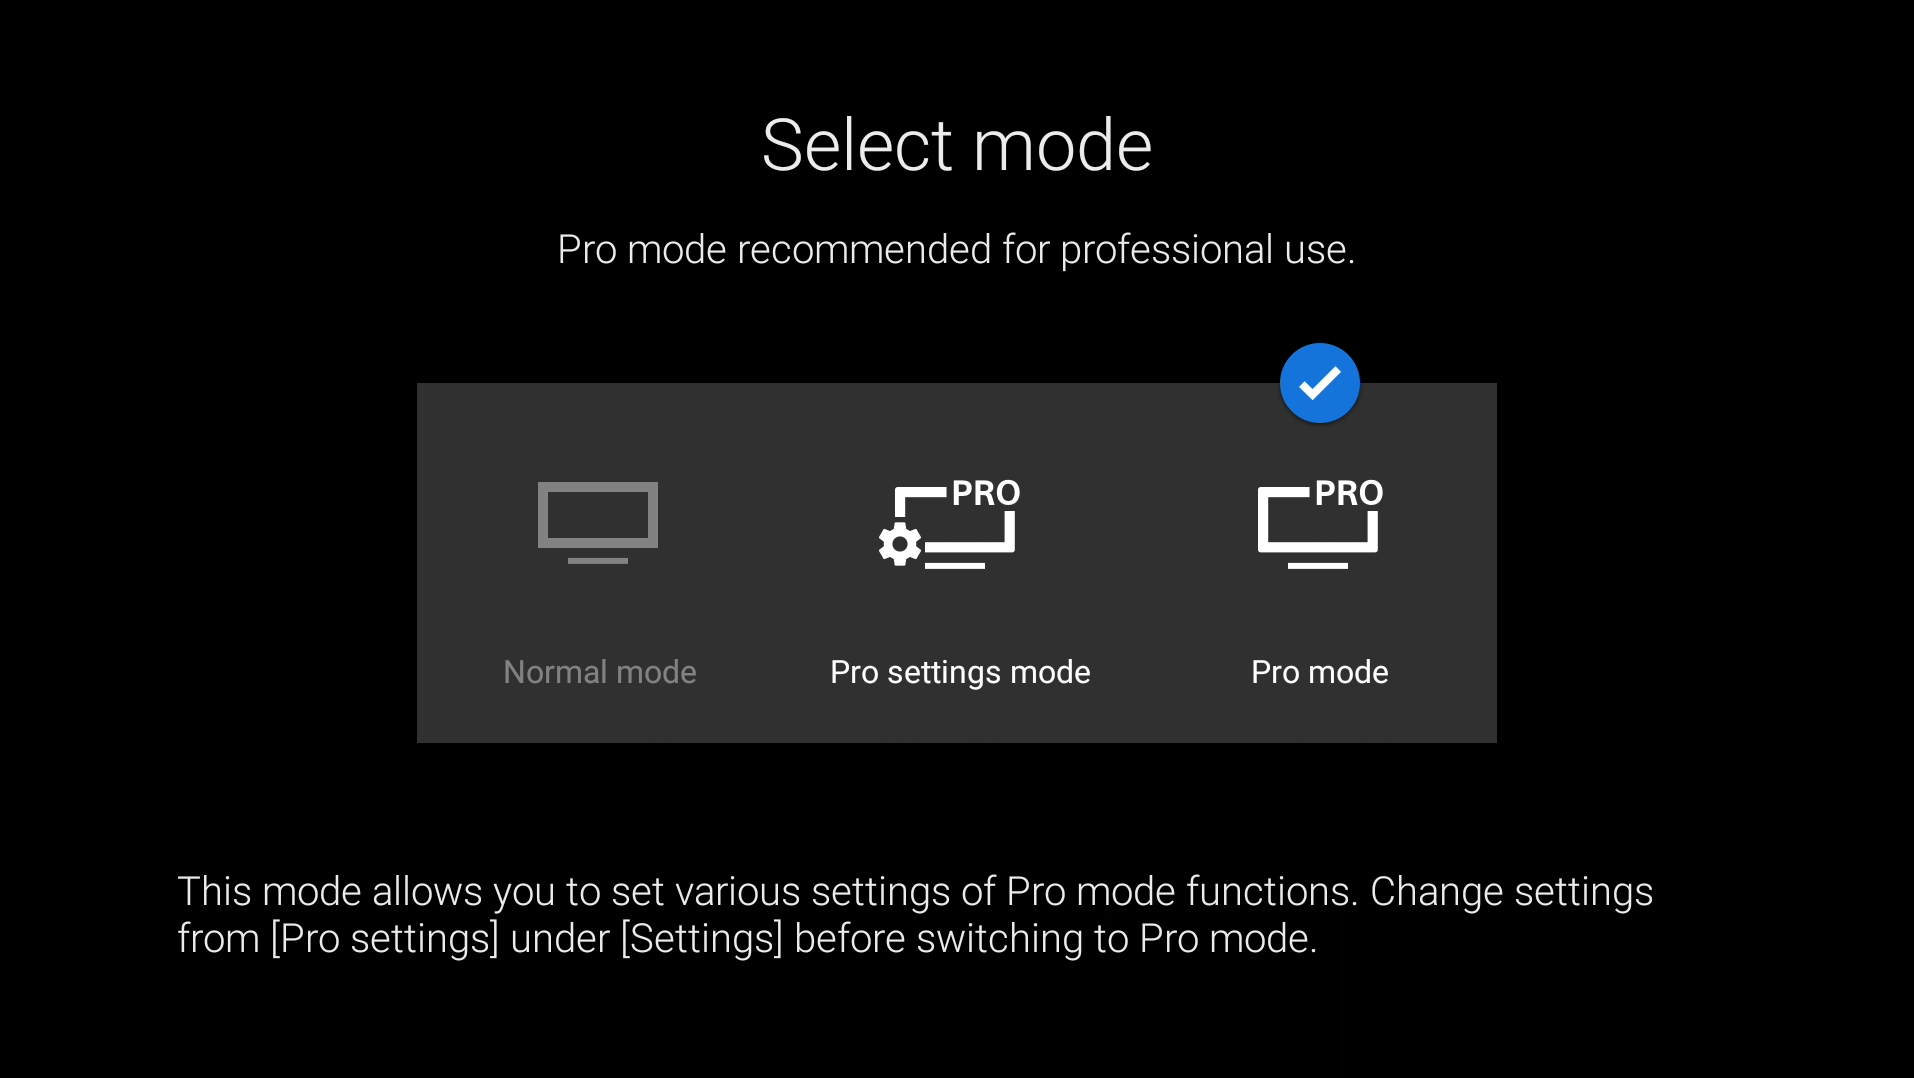
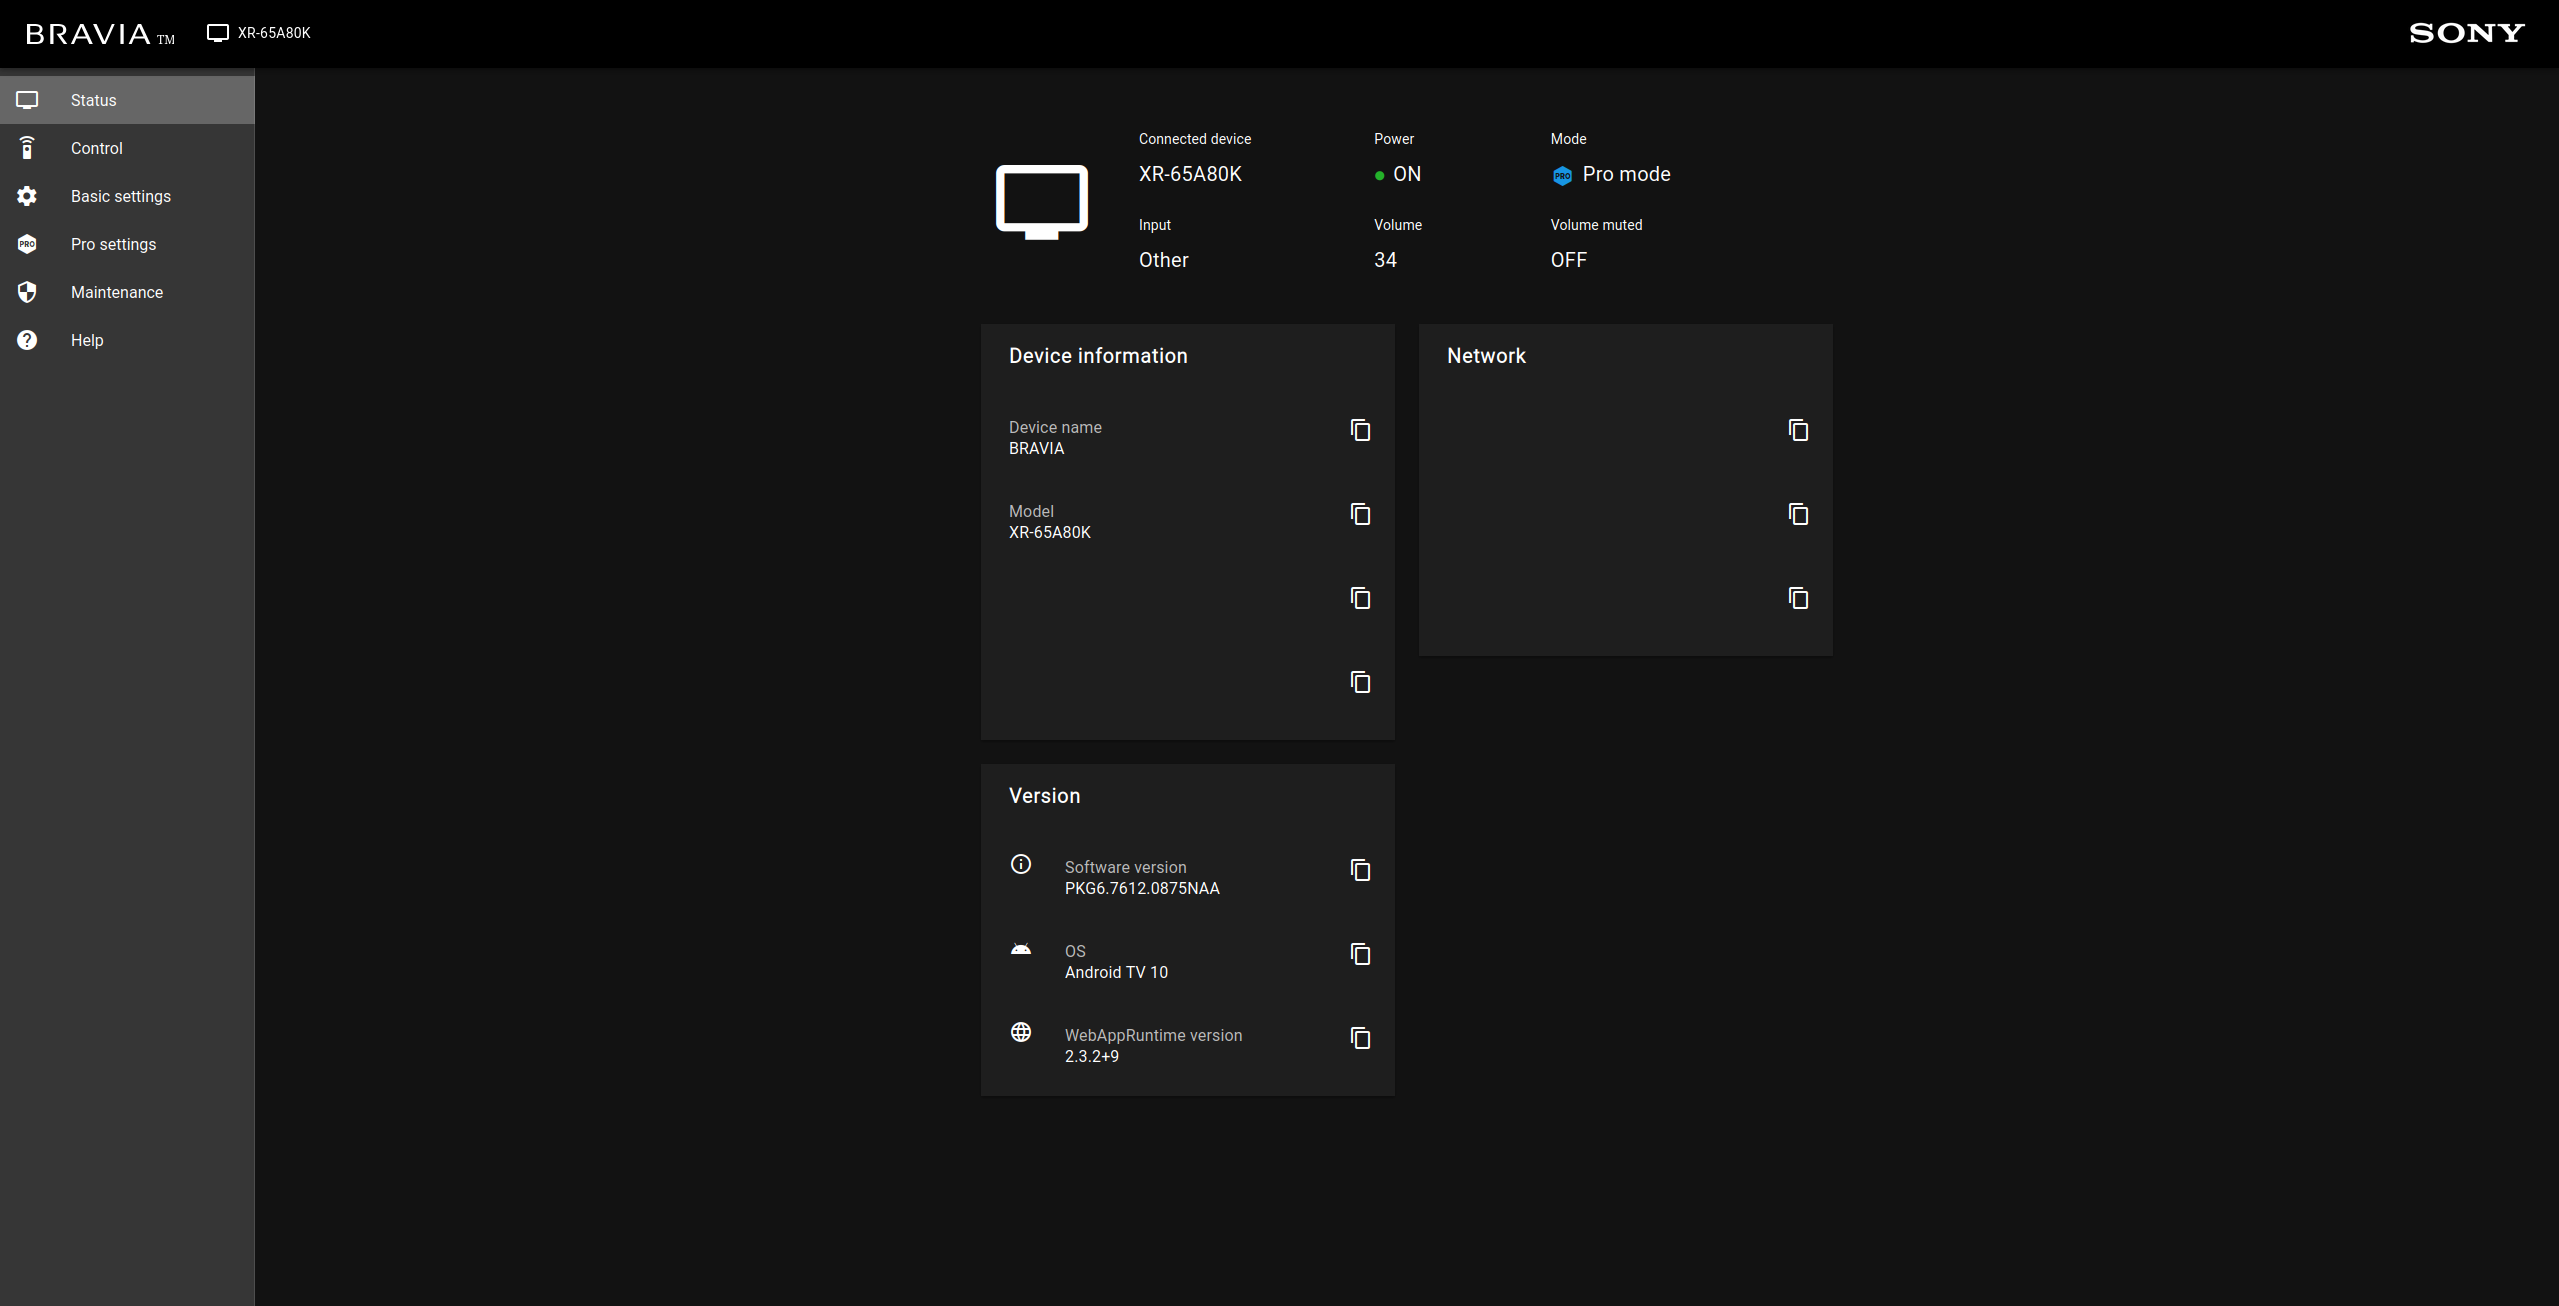
Example Image:
Here's an example image I got on the TV that I used in this guide for the stuff working.
Extras
This is also a good time to mention this is also how you can side-load apps on your TV without signing into a google account and using the play store.
If you're into foss, like me, I would recommend F-Droid.
If you see other people with the same question to get ProMode working on their TV, you should share this with them and help them out.
I don't know how long this will work for, but for now it does and works quite well. When you're in "Pro Mode", you might notice that the settings app no longer opens. That's to be expected and will not until you go back into the "Pro settings mode" or the "Normal mode".
You also might notice from time to time that there's two ProModeTool apps when switching from "Pro Mode" to "Pro mode settings" and that's also to be expected when we're side-loading it over. Both apps do work though
Now I did say you could use MacOS with this guide at the start and you can but you will have to install for example, python for MacOS, install ADB tools for MacOS instead of the windows versions and use 7zip for MacOS which is a console version instead of a gui version link here: https://7-zip.org/a/7z2408-mac.tar.xz
Or you can try and use this: https://www.keka.io/en/ Which is what the 7zip team recommended using for MacOS.
BRAVIA 8 series zip location:

I hope you enjoyed the guide.